


FOR YEARS OF DEPENDABLE OPERATION...
The AUDIOMASTER
®
System is exceptionally well designed,
with all components of the highest quality, operating well within
their respective ratings to assure long life. The following list of
Do’s and Don’ts describes minimal operating precautions and
maintenance to provide years of dependable service.
DO
use a 16 AWG or larger, heavy-duty, 3-conductor extension
cord when additional line cord length is needed.
DON’T replace the rear-panel fuse with a different size or type.
Use only 5 A, 250 V, Type 3AG.
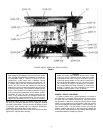
DON’T operate the Powermixer with its air vents blocked; don’t
place it on a radiator or heat-producing equipment. Avoid oper-
ation in direct, hot sunlight.
DO unplug the Powermixer before cleaning. Use only mild
detergent and a damp (never wet) cloth to clean the outer
surfaces; Don’t use strong solvents or cleaning fluids.
DON't use unbalanced low-impedance microphones with the
PHANTOM 24V switch on; turn off the switch if not required for
powering condenser microphones. If phantom power is in use,
connect unbalanced low-impedance microphones through a
line matching transformer (Shure A95UF) to a HI Z input. Phan-
tom power will not affect balanced low-impedance dynamic
microphones.
DON’T risk fire or shock hazard by operating the Model 1200
in the rain.
TROUBLESHOOTlNG
Should any difficulty be encountered in operation of your AUDIO-
MASTER System, the trouble can often be traced to some
simple source. The following is offered as a basic guide to
solving this kind of problem.
SYMPTOM
Powermixer is “dead” (no output, POWER LED off)
PROBABLE CAUSE AND CORRECTION
1.
Check that ac power source is “live” and Model 1200 is
plugged in.
2. Check that POWER switch is on.
3.
Check that rear panel fuse (5 A, 250 V) is good.
4.
If the 1200 has turned off due to excessive internal tempera-
tures, allow at least an hour for cooling, and reactivate unit.
If difficulty persists, refer to General Service Procedure in
this manual.
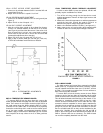
OVERLOAD LED illuminates, either
A.
Flickering with program material, indicating abnormal
1.
Check total speaker load (must be no lower than 4 ohms)
speaker load
and for possible shorted speaker cable.
B.
Continuously to indicate power amplifier shutdown
1.
Check air vents for blockage.
2.
Check that internal fan is operating (fan located on rear
panel).
3.
Turn MASTER volume control down for several minutes to
allow proper cooling. If difficulty persists, refer to General
Service Procedure.
No signal at speaker (all other functions appear normal), either
A. NORMAL LED illuminated, or
1.
Check for defective or improperly connected speaker cables.
B. NORMAL LED not illuminated
1. Check settings of channel VOLUME and MASTER VOLUME
controls.
2. Check connections to EXTERNAL DEVICE LOOP
Fuse blown
1. Replace with identical fuse (5 A, 250 V, 3AG).
2.
If second fuse blows, refer to General Service Procedure.
One of two inputs on same channel not working properly (both
1/4-inch and 3-pin jacks in use)
1.
Make sure similar microphones are used on both inputs,
and microphone impedances match the inputs used.
2.
Make sure a low-impedance microphone is not used with
aux level equipment on other input.
3.
Make sure MIC/AUX switch is in MIC position (Ch. 1 and 2
only).
4.
Make sure microphone switches are on; check microphone
cables.
2