


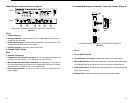
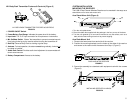

4. If the antennas are to be remote mounted, insert the supplied plastic plugs
into the holes on the front of the brackets (Figure 7).
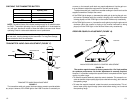
INSTALLING THE HOLE PLUGS
FIGURE 7
NOTE: If you install the receiver in a rack mount, we recommend you front
mount or remote mount your antennas.
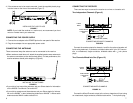
CONNECTING THE POWER SUPPLY
1. Connect the ac adapter to the POWER jack on the rear panel of the receiver.
2. Plug the ac adapter into an appropriate power outlet.
CONNECTING THE ANTENNAS
There are several ways the antennas can be connected to the receiver.
• When used as a stand-alone unit, attach the supplied quarter-wave antennas to
the antenna connectors on the receiver back panel. For best performance, the
receiver antennas should point straight up (Figure 8).
INSTALLING THE ANTENNAS
FIGURE 8
• If you wish to front mount the antennas, ask your Shure dealer for information
on the WA503 Front Mount Conversion Kit.
• If you wish to remote mount the antennas, ask your Shure dealer for informa-
tion on the WA380
1
/
2
-Wave telescoping antennas or WA490
1
/
2
-Wave cable
antennas and a WA421 cable extension kit.
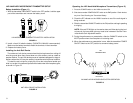
CONNECTING THE RECEIVER
There are two ways to connect the receiver to a mixer or a karaoke unit:
Two Independent Channels (Figure 9)
LX88-II
AUDIO MIXER
or KARAOKE
UNIT
CONNECTING SEPARATE CHANNELS
FIGURE 9
BACK
AC ADAPTER (PS20E)
Connect the receiver outputs for channels 1 and 2 to the mixer or karaoke unit
inputs using balanced, 2–conductor, shielded cables with 3-pin XLR connec-
tors, or unbalanced, single–conductor, shielded cables with
1
/
4
-inch phone
plugs.
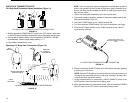
Two Channels Mixed Into One (Figure 10)
LX88-II
AUDIO MIXER
or KARAOKE
UNIT
CONNECTING MIXED CHANNELS
FIGURE 10
BACK
AC ADAPTER (PS20E)
Connect the Mixed Channels output to the mixer or karaoke unit input using
an unbalanced, single-conductor, shielded cable with a
1
/
4
-inch phone plug.
6
7