


SETUP AND CONNECTIONS
UNPACKING
Unpack all units and parts of the Wireless Microphone
System. If possible, retain packaging in the event of
returning a unit for repair. Check all boxes and inner
packaging; if any damage or shortage is discovered,
refer to the Warranty Service section of this manual.
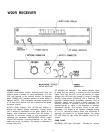
RECEIVER
Place the W20R receiver in its operating location and
connect the supplied power converter to the rear-panel
POWER Jack. Connect the power converter to a 105 to
125 Vac, 60 Hz power source.
Attach the 1/4-wave whip antenna to the receiver
ANTENNA connector. Make certain it is pointed upward.
IMPORTANT: The receiver antenna should be within
the line-of-sight of the transmitter’s operating area.
Obstructing or reflecting objects will degrade wireless
microphone performance.
If desired, the receiver can be mounted in a rack panel
kit (WA210) for mounting in a standard 19-inch audio
equipment rack.
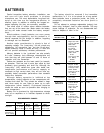
For Microphone Level Use
Obtain an XLR-type balanced low-impedance audio
connecting cable and connect it between the W20R MIC
OUTPUT Connector and the mixer or amplifier
microphone-level input (see Figure 1). Adjust the levels
as described under Level Adjustment.
RECEIVER-MIXER CABLE
FIGURE 1
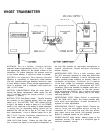
TRANSMITTER
With the transmitter POWER ON/OFF Switch in the
OFF position, slide the battery compartment access
cover down and off the transmitter case. Insert a new
9-volt transistor-radio-type battery (Duracell MN1604 or
equivalent) in the compartment. Observe the proper
polarity: the large (negative) terminal in the large chan-
nel and the small (positive) terminal in the small channel.
Operation with a full charged, heavy-duty, 8.4-volt nickel-
cadmium rechargeable battery is also permissible.
IMPORTANT:
Do not use a “conventional” 9-volt-sized
nickel-cadmium battery; its 7.2-volt output will operate
the transmitter for about 15 minutes. Carbon-zinc bat-
teries will also result in diminished operating life (about
1 hour).
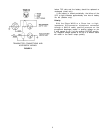
Microphone Connections
The Shure WL83 lavalier condenser microphone or
similar microphones with identical wiring and a Switch-
craft TA4F type connector can be plugged directly into
the transmitter microphone jack. The WL83 will operate
using the transmitter’s regulated +5 Vdc available on
pin 2 (see Figure 2). Self-powered (battery) condenser
microphones can be used with the transmitter only if
they can be operated in an unbalanced mode (one side
grounded). Other non-self-powered condenser
microphones may require special wiring; contact
Shure’s Service Department for further information.
Phantom-powered condenser microphones will not
operate with the W10BT.
A high- or low-impedance dynamic or ribbon
microphone with pin 2 output can be directly connected
to the transmitter using the supplied WA310 microphone
adapter cable. The cable has a 3-socket XLR connector
on the microphone end and a Switchcraft TA4F connec-
tor on the transmitter end, and is wired for unbalanced
low-impedance operation only (see Figure 2). Shure high-
impedance microphones are not wired to operate with
the transmitter. If a Shure high-impedance microphone
must be used, pins 2 and 3 should be reversed (by
qualified service personnel). Using a low-output, low-
impedance dynamic lavalier microphone such as
Shure’s SM11 may require raising the mixer input gain
appreciably, which in turn may result in an increase in
noise and signal “pumping.”
Instrument Connections
To connect the transmitter to a guitar or other musical
instrument pickup, obtain an instrument adapter cable
such as Shure’s WA300. This cable has a 1/4-inch phone
plug on one end and a Switchcraft TA4F on the other
(see Figure 2), and should function normally with any
high-impedance instrument pickup.
Battery Check
Turn the transmitter power on and depress the BAT-
TERY TEST Switch. The adjacent LED should light, in-
dicating adequate transmitter input voltage. If the LED
does not light, the alkaline battery voltage has dropped
8