


84
CVP-109/107/105/700
■ Advanced Accompaniment Assistance ...................................
Here are some other things you can do with Accompaniment Assist-
ance data.
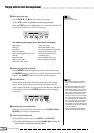
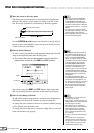
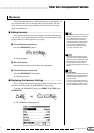
● Changing Part Volumes
You can program volume changes for the Auto Accompaniment parts.
Used judiciously, these can help you create professional-sounding dy-
namic changes in your performance. To do this, press the [MIXER] but-
ton and change the part volume settings as desired, then press [EXIT] to
return to the ACMP ASSIST display. The volume event symbol (which
looks like a speaker) should now appear in the box in the middle of the
display. Press the SET button to set the volume change as entered.
An initial volume event is automatically
entered at the top of the first measure,
based on the current part volume settings
when the ACMP ASSIST display is first
opened.
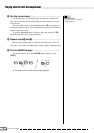
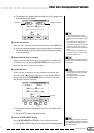
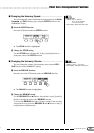
● Changing the Tempo
You can also program tempo changes in the middle of a performance.
Simply position the cursor at the point where you want the tempo to
change, then use the TEMPO [–] and [+] buttons to select the new
tempo. The new tempo is displayed in the box in the middle of the
ACMP ASSIST display. Press the SET button to set the tempo change as
entered.
An initial tempo event is automatically
entered at the top of the first measure,
based on the current tempo settings
when the ACMP ASSIST display is first
opened.
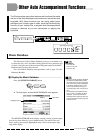
● Entering a Rhythm Break
You can have Accompaniment Assistance play the rhythm part alone
(without other accompaniment) as a transitional “rhythm break.” To do
this, you must record a “no chord” event at the beginning of the break.
Press any three adjacent keys (two white keys and a black key, or vice
versa) in the left range of the keyboard when using the Fingered 1 or
Fingered 2 mode, or select TYPE and use the data dial or [–] and [+]
buttons to display a series of dashes (- - -) as the setting for that function.
Then press the SET button to register the break.
● Entering an Accompaniment Break
A complete break can be useful if you want to play the keyboard part
solo. To create an accompaniment break, set a “no chord” event as de-
scribed above, and turn the rhythm off as described on the next page.
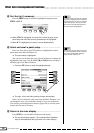
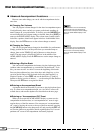
● Entering an “Accompaniment Off” Event
When you first open the ACMP ASSIST display to create new Ac-
companiment Assistance data, an “accompaniment on” event is regis-
tered at the top of the first measure. You can enter an “accompaniment
off” event by moving the cursor to the top of the first measure, pressing
the [ACMP ON] button so the lamp turns off, and pressing the SET but-
ton. See the sidebar on page 86 for details regarding the use of “accom-
paniment off” events in Accompaniment Assistance playback.
Other Auto Accompaniment Functions
82