


Basic Operation 15
EMX860ST—Owner’s Manual
Basic Operation
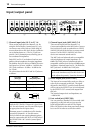
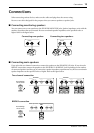
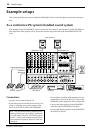
Connecting microphones
and instruments
1 Before connecting mics or instruments,
make sure that the power of all equip-
ment (where applicable) is turned off.
Also make sure that the level controls of
each channel of the EMX860ST and the
MASTER control of the MAIN section are
turned down.
2 Connect cables to your mics and instru-
ments, and insert the other end of the
cable firmly into the appropriate Lo-Z/Hi-
Z jack (channels 1–6) or the MIC/LINE
jack (channels 7–8).
3 Turn the power on in the order of periph-
eral devices ➞ EMX860ST.
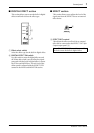
4 Set the MAIN section MASTER control to
the √√
√√
position.
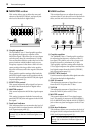
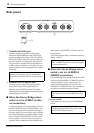
Adjusts the stereo image of each channel using
the PAN controls. (Adjust the balance between
the left and right volume levels of the sound
sources connected to the LINE connectors L/R
for channels 7 and 8 using the BAL/PAN con-
trols.)
5 While speaking into the mic (while play-
ing the instrument), adjust the channel
LEVEL control so that the 0 LED of the
MAIN section peak level meter lights
occasionally.
6 If you wish to adjust the tone of each
channel, rotate the equalizer controls as
desired.
7 Use the MAIN section graphic equalizer
and MASTER control to adjust the overall
volume and tone.
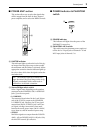
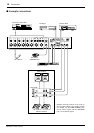
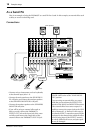
Sending an independent
mix to the monitor speakers
1 Set the MONITOR section MASTER con-
trol to the √√
√√
position.
2 Adjust the MONI control to increase the
level of the channel you want to hear
from the monitor speaker, and also adjust
so that the peak level meter 0 LED of the
monitor section lights up occasionally.
3 Use the graphic equalizers and MASTER
controls of the MAIN/MONITOR sections
to adjust the overall volume and tone.
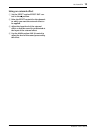
Using the digital effect
The EMX860ST has a built-in digital effect,
allowing reverberation or ambiance to be added
to vocals or instrumental sounds.
1 Connect a mic or instrument to the
desired channels, and adjust the volume
and tone.
2 Press the DIGITAL EFFECT ON switch of
the DIGITAL EFFECT section.
3 Use the effect select switches of the DIGI-
TAL EFFECT section to select the effect
type.
VOCAL ...... Reverb appropriate for vocals.
L. HALL...... Reverb typical of a large hall.
S. HALL...... Reverb typical of a small hall.
4 Raise the EFFECT control of the channels
to which you wish to apply the digital
effect.
5 Use the MAIN/MONITOR section EFFECT
RTN control to adjust the level of the
sound processed by the effect.
Note: When connecting a line level device to
channels 1–6, turn on the PAD switch.
You cannot use a channel’s Lo-Z and Hi-Z
jacks, and MIC and LINE jacks at the same
time.
Note: When turning the power off, reverse this
sequence.
Note: The MONI controls are not affected by
the level settings of each channel. This allows
you to create a mix that is independent of the
MAIN section.
Note: If the effect sound is distorted even if the
EFFECT RTN is turned all the way down, lower
the EFFECT controls of each channel.