


19
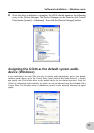
The GO44 Control Panel is quite intuitive and should not present beginners with major problems.
Here, depending on the requirements of each situation, you can have total control of the audio
interface, reduce levels, route inputs to any output or set the Master Clock values.
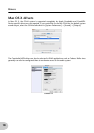
The functions and the positions of the control elements are generally identical between the two
platforms, Windows and Mac OS. The following example illustrations have been taken from the
Windows version of the Control Panel.
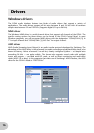
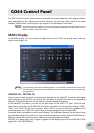
MAIN display
In the MAIN display, you can control the digital mixer of the GO44, set sample rates, route any
input to any output, etc.
If you are working with common DAW applications, you should also use the DAW for level control.
The advantage for doing this is that the settings are usually saved together with your project (song,
arrangement etc.)
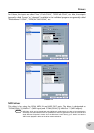
ANALOG IN / DIGITAL IN
Here you can control the levels of analog input channels in the ANALOG IN column and digital
input channels in the DIGITAL IN column. Use the faders to control the levels of corresponding
channels. The [MUTE] buttons can be used to mute the individual channels.
In the ANALOG IN column, you can set the gain levels of the INPUT 1/2 jacks. Click the pull-
down menu at the top of the ANALOG IN column and select from among the settings “LOW”,
“MID”, and “HIGH” for the input channels. Select “HIGH” to connect low-level equipment such
as microphones, and “LOW” to connect high, line-level equipment such as keyboards.
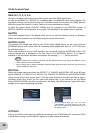
A separate fader is available for each mono channel. The individual channels can be joined using
the switchable stereo link function. To turn on/off the stereo link function, click the [PAIR] button.
While the stereo link function is active, faders and mute operations are linked.
DIGITAL IN is grayed out until a signal is applied to the digital input and the MASTER CLOCK
(page 20) is set to [EXTERNAL].
GO44 Control Panel
NOTE
NOTE