


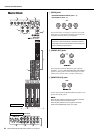
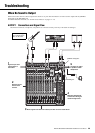
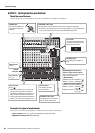

Controls and Connectors
MG20XU/MG20/MG16XU/MG16/MG12XU/MG12 Owner’s Manual
28
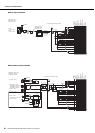
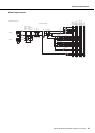
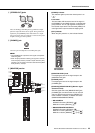
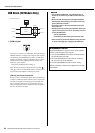
USB Block (XU Models Only)
• [USB 2.0] jack
Connects to a computer via a USB cable. The signal from the
STEREO L/R buses is output to the computer. (This signal is
not affected by the [STEREO] master fader.) A USB driver
might be required for computer input/output. You can down-
load the driver from the following Yamaha website, and
install it on your computer.
http://www.yamahaproaudio.com/mg_xu
When the [ST] switch of a channel which has a [LINE /
USB ] switch is on while DAW software is being used, a
loop is formed and feedback or howling may result.
[USB 2.0] Connection Precautions
Be sure to observe the following points when connecting to a
computer’s [USB 2.0] interface. Failure to observe these rules
can result in computer freezes/hang-ups and possibly data
loss or corruption. If the mixer or computer does hang up,
restart the application and/or computer and turn the power to
the mixer off and then on again.
NOTICE
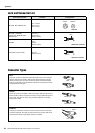
• Use an A/B type USB cable. The cable should be no
more than 1.5 meters long. A USB 3.0 cable cannot be
used.
• Be sure to wake the computer from sleep/suspended/
standby mode before making a connection to the com-
puter’s [USB 2.0] connector.
• Connect the mixer to the computer before turning the
mixer power on.
• Always perform the following two operations before turn-
ing the mixer’s power on or off, or connecting or discon-
necting the USB cable.
- Exit all applications.
- Confirm that no data is being sent from the mixer.
• Allow at least six (6) seconds between turning the mixer
on or off, and plugging or unplugging the USB cable.
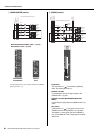
USB-REC-L
USB-REC-R
USB-PLAY-L
USB-PLAY-R
USB Audio
Controller
USB-Att.
only MG20XU/MG16XU/MG12XU
(USB-Att.)
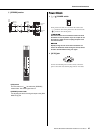
Attenuator Function
The [PROGRAM] knob e (page 22) can be used to adjust the
volume of audio playback from a computer.
1. Press the [PROGRAM] knob five times consecutively to dis-
play the attenuation value (dB).
2. Turn the [PROGRAM] knob to set it between -24 dB to 0
dB. (The minus sign is not displayed.)
3. Press the [PROGRAM] knob again to exit the setting.
When the attenuator is enabled, the dot lights at the lower right
of the display.