


Troubleshooting
MG20XU/MG20/MG16XU/MG16/MG12XU/MG12 Owner’s Manual
30
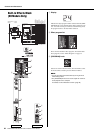
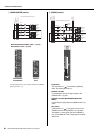
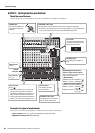
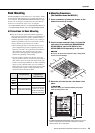
STEP 2 Setting Switches and Controls
Check the overall balance
Use the settings shown in the illustration to check the overall balance from speakers or headphones.
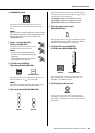
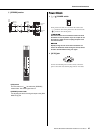
To monitor the signal of each channel
You can use the level meter and headphones to check the pre-fader signal for each channel.
• [PFL] switches: Turn on ( ) for the channel(s) you want to check.
• [MONITOR LEVEL] knob: Adjust the level.
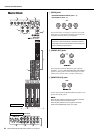
[GAIN] knobs
Turn until the [PEAK] indi-
cator begins to flash inter-
mittently.
[PHANTOM +48V] switch
Turn this switch on (the indicator lit) when using a condenser microphone.
• To prevent an unwanted burst of noise from the speakers, turn off powered speak-
ers (or power amps) before turning on the [PHANTOM +48V] switch.
[ON] switches
On (lit)
[ST] switches
On ( )
[PEAK]
indicators
[PFL] switches
All off ( )
• When [PFL] switches are on, only the sig-
nals from those channels are sent to the
level meter and headphones. Therefore, you
will be unable to check the overall sound.
• If the [PFL] indicator below the level meter is
flashing, one or more [PFL] switches are on.
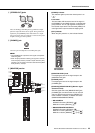
Channel faders
For adjusting the level
for each channel.
[STEREO] master fader
For adjusting the overall volume,
with “0” as the nominal level.
[SOURCE]/[SOURCE SELECT]
(Monitor signal selection switch)
Use to monitor the sound via the level
meter and/or headphones.
•MG12XU/MG12
STEREO L/R buses: [STEREO] ( )
GROUP 1-2 buses: [GROUP] ( )
• MG20XU/MG20/MG16XU/MG16
STEREO L/R buses: [STEREO] ( )
GROUP 1-2 buses: [GROUP] ( ),
[1-2] ( )
GROUP 3-4 buses: [GROUP] ( ),
[3-4] ( )
[PHONES] knob
For adjusting the headphone
level.
Level meter
If the level meter [PEAK] indica-
tor flashes frequently, lower the
faders for each channel.