


MOTIF XS Owner’s Manual
Creating a Voice/Performance by Using the Sampling Function
163
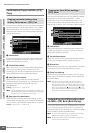
Voice mode
Song mode
Pattern mode
Mixing mode
Master mode
Utility mode
File mode
Performance
mode
Sampling
mode 1
Sampling
mode 2
Reference
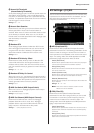
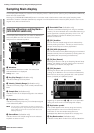
Sampling Record
[INTEGRATED SAMPLING] ➞ [F6] Rec
The Sampling Record function lets you record sounds—such as vocals from a connected microphone, the signal from an
electric guitar, or audio from an external CD or MP3 player—directly to the MOTIF XS, and store them to the instrument as
Samples. The Samples obtained via the Sampling function can be played back from the keyboard by assigning them first to
a Waveform, then a Voice.
Important
In order to use the Sampling function, DIMM modules must be installed to the instrument. For details on installing DIMMs, see page 295.
The recorded (edited) Sample data residing temporarily in DIMM is lost when the power is turned off. Make sure to prepare the USB storage
device or a computer connected to the same network as the MOTIF XS before using the Sampling function.
Sampling Procedure
In this section, you’ll learn how to create a Voice or
Performance by using the Sampling function.
1 Connect a microphone or other audio
equipment to the MOTIF XS.
For information about how to do this, see page 39.
If you want to use the sound of the MOTIF XS as a
recording source (with the Resampling function), this
step is unnecessary.
2 Enter the Voice mode or Performance mode.
When entering the Performance mode, select a
Performance to which the Sample will be assigned.
3 Press the [INTEGRATED SAMPLING] button to
enter the Sampling mode. (The indicator
lights.)
The Sampling Main display appears.
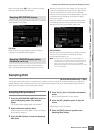
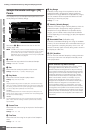
4 Press the [F6] Rec button to call up the Record
Setup display (page 164).
Set the following parameters in the Setup display. The
numbers in parentheses below refer to the parameters
in the Sample Record display on the next page.
• The Input Source (2) determines the connector from
which the audio source (microphone, audio equipment,
etc.) is input.
• The Waveform (6) determines the Waveform number.
• The Voice ()) determines the Voice Bank and Number.
• The Part (9) determines the Performance part to which
the Voice is assigned when entering the Sampling mode
from the Performance mode.
• Set other parameters as necessary.
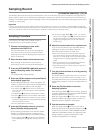
5 Press the [F6] Standby button to call up the
Record Standby display (page 166).
Set the following parameters on the Standby display.
Numbers in the parentheses are equivalent to the
numbers pointing parameters on the Standby display.
• Set the Trigger Mode (8) to determine the method by
which Sampling will be triggered. Normally, set this to
“level.”
• If you set the Trigger Mode (8) to “level,” you will also
need to set the Trigger Level (7). Set this parameter so
that the red triangle of the level meter (indicating the
Trigger Level) is slightly below the level at which the
sound is input.
6 Adjust the input sound level for optimum level.
Try to set the input level as high as possible without
clipping for the best sound quality. Follow the
instructions below to adjust the input level.
• When the Input Source is set to A/D Input, adjust the
input signal level by using the GAIN knob on the rear
panel. If you cannot adjust the input level appropriately,
change the Mic/Line setting (page 263) in the Utility
mode.
• When the Input Source is set to Resample, adjust the
input signal level by setting the Record Gain.
• When the Input Source is set to mLAN, the input level
cannot be adjusted.
7 Turn the Confirm function on or off by pressing
the [SF1] button.
The Confirm tab turns green when set to on, and turns
gray when set to off. When Confirm is turned on, you
can easily listen back to your just-recorded Sample and
conveniently re-record it if you are not satisfied with the
results.
8 Press the [F5] Start button to start the
Sampling operation.
When the Trigger Mode (8) is set to “manual,” pressing
the button immediately starts Sampling (a RECORDING
indication appears in the display).
When the Trigger Mode (8) is set to “level,” pressing
the button enables Sampling but does not start it (a
WAITING indication appears in the display).
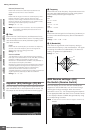
9 Play the sound to be sampled.
When the Trigger Mode (8) is set to “level” and an
audio signal exceeding the specified Trigger Level (7)
is input to the instrument, the RECORDING indication
replaces the WAITING indication and Sampling starts.
During Sampling, a graphic representation of the
recorded audio appears in the display.