


38
This chapter describes several important disk
control functions: Formatting new disks, copying
songs, and deleting songs.
Disk Control
■ Formatting a New Disk
The PDP-400 uses only 3.5" 2DD floppy disks. We recommend that you use Yamaha 2DD disks. Before you can use
a new disk for recording, the disk must be “formatted” so that the PDP-400 can recognize it and correctly write the mu-
sic data onto it.
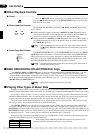
ZInsert the Disk To Be Formatted ...........................................................................................................
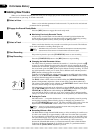
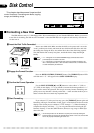
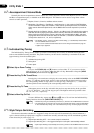
Insert a new blank disk. Make sure that the disk’s write protect tab is set to the
“write” position (tab closed), and insert the new disk into the disk drive unit with
the sliding door facing the drive slot and the label side of the disk facing upward.
The disk should click securely into place, and the disk drive lamp should light
briefly.
NOTES
•“
For
” will appear on the SONG NUMBER display to indicate that a blank
(unformatted) disk is loaded in the drive.
•“
Pro
” will appear if a protected disk that cannot be formatted is loaded in the
drive: a write-protected disk, a Disk Orchestra Collection disk, a Disklavier disk,
or a disk formatted by the Disklavier.
Write protect tab
closed (unlocked —
write enabled)
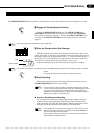
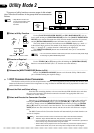
XEngage the Format Function .................................................................................................................
Press the DISK CONTROL [FORMAT] button. The [FORMAT] button LED
will flash and “nY” will appear on the SONG NUMBER display.
CConfirm the Format Operation ..............................................................................................................
Use the SONG NUMBER [▲] and [▼] buttons to select either “n” (NO) or
“Y” (YES) on the display. “Y” if you intend to execute the format operation or “n”
if you wish to cancel the operation. This step is necessary because formatting com-
pletely erases any data that is already on the disk — make sure that the disk you’re
about to format does not contain any important data!
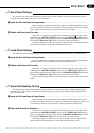
VStart Formatting......................................................................................................................................
If you selected “Y” in the previous step, press the [FORMAT] button again and
formatting will begin. The number of each “track” on the disk will be shown on the
display as the format process continues (“F80” through “1”). When formatting is
complete (the display will show “1”), you can go ahead and record using the per-
formance memory, or use the COPY function (below) to copy songs or Disk Style
data to the disk.
NOTES
• The format operation can be aborted at any time prior to actually starting the
format operation by pressing the [START/STOP] button. In this case, the disk will
have to be properly formatted again before use.
TAP TEMPO
METRONOME
SONG NUMBER
MAX
MIN
MAX
MIN
MAX
MIN
MIN MAX
VARIATION NORMAL
INTRO/ENDING
START/STOP
AUTO BASS CHORD
SOLO
STYLEPLAY
SYNCHRO
START
SINGLE FINGERFULL KEYBOARD FINGERED
JAZZ
ROCK
POP
DANCE
POP
16BEAT
BALLAD
ROCK’N’
ROLL
ROCK
SHUFFLE
SWING
BOOGIE
BIG BAND
SAMBA
BOSSA
RHUMBA
CHA-CHA
POLKA
MARCH
JAZZ
WALTZ
WALTZ
BLUE-
GRASS
STYLE
POWER
HOUSE
16BEAT
POP
16BEAT
SHUFFLE
SLOW
ROCK
COUNTRY
SHUFFLE
DISK
STYLE 1
DISK
STYLE 2
JAZZ
BALLAD
PIANO E.PIANO HARPSI VIBES GUITAR STRINGS SPLIT
ORGAN CHOIR
UPRIGHT
BASS
ELEC
BASS
DRUMS VOICE 13-60
CLAVINOVA
TONE
VOICE
8
1
2
3
4567
90
DISK ORCHESTRA / PERFORMANCE MEMORY
PHRASE
REPEAT
CHORD
SEQUENCE
REC
FORMAT
COPY
PAUSE
F F
REW
START/STOP
SONG
SELECT
RIGHT/1TR
LEFT/2TR ORCH/3-10TR RHYTHM
/
DISK CONTROL
GUIDE
COSMIC
HALL 2
HALL 1
ROOM
SOLO STYLEPLAY
START/STOP
SOSTENUTO
REVERB
DEMO
SOFT
MIDI/
TRANSPOSE
MASTER VOLUME
RHYTHM
CHORD 1
CHORD 2
BASS
AUTO ACCOMPANIMENT
BEAT
FOOT SWITCH
FORMAT
COPY
DISK CONTROL
FORMAT
n8Y
SONG NUMBER
F80
SONG NUMBER