


9
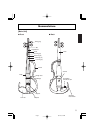
1st string (E)
4th string (G)
2nd string (A)
3rd string (D)
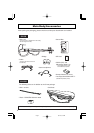
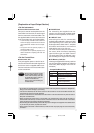
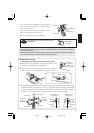
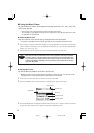
● Winding the Strings
(Please refer to this section when changing the strings)
1
Before you string the instrument, set the adjuster so that it is in the
middle of its adjustment range. (All adjusters)
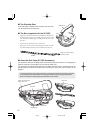
2
Place the ball (on the end of the string) in the notch on the adjuster.
Make sure the ball is properly inserted in the adjuster’s notch.
3
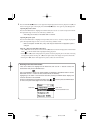
Insert the other end of the string into the hole on the tuning peg. Rotate the tuning peg. As shown in the
illustration, wind the string on the side away from the peg handle once around the peg, then return the
string back overlapping that wind so that the remaining slack is wound gradually toward the peg handle.
1st (E) and 2nd (A) strings are shown on the left, 3rd (D) and 4th (G) strings on the right.
Adjuster’s notch
String
Ball
The adjuster
should be set to
the middle of its
adjustment range.
Rotate the
tuning peg
as shown
Rotate the
tuning peg
as shown
1st string (E)
4th string (G)
2nd string (A)
3rd string (D)
Winding the 1st
and 2nd strings
Remaining
winds
1st
wind
Winding the 3rd
and 4th strings
1st
wind
Remaining
winds
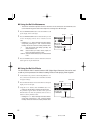
If the adjuster is too loose, it could produce noise
while playing.
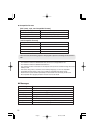
•The strings are tuned to the following pitches. The 1st
string is tuned to E, the 2nd string to A, the 3rd string to
D, and the 4th string to G.
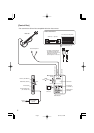
Using the Tuner function on the Control Box (→ pg 11),
push in on the peg while turning to tune.
•Finally, use the adjuster to fine tune the strings.
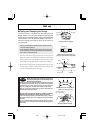
Don’t loosen
too much.
• When the instrument is not going to be used for an extended period of time, loosen the strings until the
pitch drops a whole tone.
• Before using the instrument, make sure that the bridge is positioned vertically. Damage to the bridge and
poor sound quality may result if the bridge is not properly positioned.
Caution
08.12.3, 5:55 PMPage 9