


Keyboard Stand Assembly
Owner’s Manual
59
ENGLISH
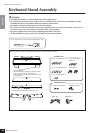
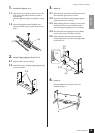
1. Attach the adjuster to C.
1-1 Align the tip of the adjuster with the screw hole,
then screw in the adjuster all the way until it
stops turning.
You will adjust the height of the adjuster in Step
8.
1-2 Untie and straighten out the bundled cord.
Don’t discard the vinyl tie, you’ll need it later in
Step 7.
2. Attach (finger-tighten) D and E to C.
2-1 Align D and E with each end of C.
2-2 Attach D and E to C by finger-tightening the long
screws (6 x 20mm).
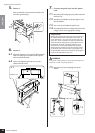
3. Attach B.
3-1 Place the lower side of B on each foot of D and E,
then attach the upper side to D and E.
3-2 Attach the top of B to D and E by finger-tighten-
ing the thin screws (4 x 12mm).
3-3 While pushing the lower outside part of D and E
towards each other, secure the bottom of B at
each end using two tapping screws (4 x 20mm).
3-4 Insert the other two tapping screws (4 x 20mm)
into the other two screw holes to secure B.
3-5 While pushing D and E towards each other,
securely tighten the screws that were finger-tight-
ened in Step 3-2.
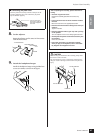
4. Secure C.
Securely tighten the screws on C that were
attached in Step 2-2.
C
1-1
1-2
2-2
D
E
C
B
E
D
3-2
3-5
3-3
3-4
3-1
B
D
E
C
4