


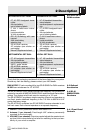

3 Setting Up
27WMS 40 SINGLE/DUAL
Important!
3.1 Positioning the
Receiver
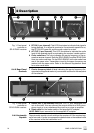
3.2 Connecting the
Receiver to a
Balanced Input
Refer to fig. 5 on page 3.
3.3 Connecting the
Receiver to an Un-
balanced Input
Refer to fig. 6 on page 3.
Important!
3.4 Connecting the
Receiver to Power
Refer to fig. 7 on page 3.
Prior to setting up your WMS 40 SINGLE/DUAL, check that the
transmitter and receiver are tuned to the same frequency. The eas-
iest way to do this is to compare the color codes on the transmitter
and receiver.
• You can either use the receiver freestanding or mount it in a 19" rack
using the optional RMU 40 PRO rack mounting kit. For instructions on
how to rack mount the receiver, refer to the RMU 40 PRO manual.
• Reflections off metal parts, walls, ceilings, etc. or the shadow effects
of musicians and other people may weaken or cancel the direct trans-
mitter signal.
For best results, place the receiver as follows:
1. Place the receiver near the performance area (stage). Make sure,
though, that the transmitter will never get any closer to the receiver
than 10 ft (3 m). Optimum separation is 16 ft. (5 m).
2. Check that you can see the receiver from where you will be using
the transmitter.
3. Place the receiver at least 5 ft. (1.5 m) away from any big metal ob-
jects, walls, scaffolding, ceilings, etc.
1. For each channel, use a balanced cable with an XLR connector and
1/4" TRS jack plug (available from electronics or hi-fi stores).
2. Connect the (each) AUDIO OUT jack (8) on the receiver rear panel to
the desired balanced (XLR) microphone input on the mixer or ampli-
fier.
3. Turn the (two) VOLUME control(s) (3) on the receiver all the way CCW
to set the receiver output to mic level.
1. Use a standard 1/4" jack cable to connect the (each) AUDIO OUT jack
(8) on the receiver rear panel to an unbalanced 1/4" line input jack on
the mixer or amplifier.
2. Turn the (two) VOLUME control(s) (3) on the receiver all the way CW to set
the receiver output to line level.
To avoid hum interference, do not use audio cables longer than 10
feet (3 m)!
1. Check that the AC mains voltage stated on the included power sup-
ply is identical to the AC mains voltage available where you will
use your system. Using the power supply with a different AC volt-
age may cause damage to the unit.
2. Point the antenna(s) (2) upward.
3. Plug the feeder cable on the included power supply into the DC ONLY
socket (10) on the receiver.
4. Bend part of the feeder cable into a small bight, pass the bight through
the strain relief (9) from above, and slip the bight over the hook on the
strain relief (9). Tighten the cable.
5. Plug the AC adapter into a convenient power outlet.
6. Press the ON/OFF switch (1) to switch power to the receiver ON.