


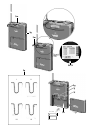

3f CHANNEL: This rotary switch selects the desired carrier fre-
quency.
3g Belt Clip for fixing the transmitter to your belt.
3h Battery Compartment: Refer to Section 9. Setting Up.
3i Antenna: Permanently connected, flexible antenna.
3j GAIN: This rotary pot allows you to match the microphone or
instrument level to the transmitter’s audio section.
3k Carrier Frequency Table: A label listing the available fre-
quencies is affixed to the transmitter rear panel.
3l Frequency Set Designation: The label on the rear panel also
indicates the designation of the Frequency Set.
3m Security Cover: Protects the POWER and MIC switches from
being actuated unintentionally.
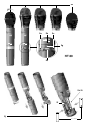
6.2. Microphones, Guitar Cable (optional)
The following AKG microphones have been designed specifically
for direct connection to the audio input of the PT 80:
C 417 L
C 419 L
C 420 L
CK 77 L
The MKG/L guitar cable from AKG lets you connect an electric
guitar, electric bass, or remote keyboard to the bodypack trans-
mitter.
6.3. Optional Accessories
CB 60/80 bag
Color Coding Kit
7. Frequencies
The transmitter and receiver of your WMS 80 system have been
factory programmed for up to 15 selectable carrier frequencies.
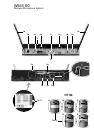
The carrier frequency label (1k) on the receiver, (2g) on the hand-
held transmitter, or (3k) on the bodypack transmitter lists the
Frequency Set your WMS 80 system uses and all available carrier
frequencies.
7.1. Frequency Sets
Prior to powering up your WMS 80 system, check that the trans-
mitter and receiver use the same Frequency Set. If they do not, you
may not be able to find a common carrier frequency for the trans-
mitter and receiver.
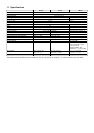
The following Frequency Sets are currently available:
Designation Frequency Countries
Range (MHz)
EU58 770,6 - 773,4 EU
EU59 777,6 - 780,4 EU
EU60 785,6 - 788,4 EU
JPA 802,5 - 805,5 EU, Japan
NZ1 812,2 - 815,0 EU, New Zealand
NZ2 833,2 - 835,0 EU, New Zealand
UK69A 854,9 - 857,625 EU, Great Britain
UK69B 858,2 - 860,9 EU, Great Britain
US54 710,2 - 713,0 USA
US55 719,0 - 721,8 USA
US58 734,4 - 737,2 USA
US59 742,8 - 745,6 USA
For frequencies allocated in the various countries and frequencies
suited for intermodulation-free simultaneous operation, refer to the
Frequency List in section 12.
7.2. Ordering Transmitters and Receivers
If you want to order additional transmitters or receivers operating
on the same set of frequencies as your original equipment, be sure
to state the designation of your original Frequency Set (1k/1l, 2i,
3k/3l) and the serial number of the original device. We need this
information to make sure your new equipment will be compatible
with the original units.
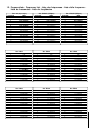
8. Multichannel Systems
Carrier frequencies allocated to wireless microphones differ from
country to country. Depending on local frequency allocations and
available carrier frequencies you can operate two to four
WMS 80 systems simultaneously. (Refer to the Frequency List in
section 12.)
In each carrier frequency table (1k, 2h, 3k) and in the Frequency
List in section 12, the basic frequencies you can use simulta-
neously and without risk of intermodulation are marked with *.
If you have any questions regarding allocated frequencies contact
your dealer, the competent authority, your AKG representative, or
the AKG head office in Vienna, Austria.
Alternatively, you are welcome to visit the AKG website at
www.akg-acoustics.com where you can download a FREE fre-
quency management program for AKG Wireless Microphone
Systems.
9. Setting Up
Prior to connecting the receiver to AC power and inserting the bat-
teries into the transmitter, set the transmitter and receiver to the
same carrier frequency. The carrier frequency tables on the trans-
mitter (2h, 3k) and receiver (1k) and the Frequency List (section 12)
on page 44 list the channel number corresponding to each carri-
er frequency.
9.1. Selecting the Carrier Frequency
1. Handheld transmitter: Unscrew the battery compartment
cover and the color code ring (2d or 2j) CCW.
Bodypack transmitter: Open the battery compartment
(3h).
All controls are now accessible.
2. Use the supplied screwdriver (1q) to set the CHANNEL control
(2g) on the handheld transmitter or (3f) on the bodypack trans-
mitter to the desired channel.
3. Set the CHANNEL control (1d) on the receiver to the same
channel as the transmitter.
9.1.1. Multichannel Systems
1. Be sure to assign a separate carrier frequency to each trans-
mission channel (transmitter + receiver).
2. Set the transmitter and receiver to one of the frequencies mark-
ed with * in the carrier frequency tables (1k, 2h, 3k).
Note: If reception on the selected carrier frequency is disturbed,
set the carrier frequencies for all WMS 80 channels
within the same frequency set up or down one step
with the respective CHANNEL controls (1d, 2g, 3f) on each
transmitter and receiver.
This is necessary to provide the minimum frequency spacing
required for intermodulation-free multichannel operation.
Important: Do not operate two or more WMS 80 channels on
the same frequency at the same time and location. This would
cause unwanted noise due to radio interference.
9.1.2. Changing Carrier Frequencies
Prior to changing a carrier frequency, be sure to switch the