2
A Tour of the MultiMix USB2.0
20
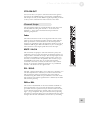
Rear of the Mixer
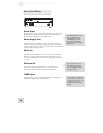
Here’s what you’ll find at the rear of the mixer.
Power Input
Here’s where you plug in your mixer’s external power supply. You
should always connect your power supply to the mixer before you
plug the power supply into an electrical outlet.
Power Supply Unit
This unit provides 18.5 VAC at 700 mA of power, more than
enough to keep your MultiMix running smoothly. As with nearly
all power supply units, this one tends to get warm when left on for
a while. This is perfectly normal.
Power On
Another easy one. Switch this one on and your mixer has power.
Switch it off and it doesn’t. Make sure the faders in the master
section are pulled all the way down when powering your mixer up
or down.
Phantom On
This switch activates and deactivates the phantom power
described in “Mic Inputs (Channels 1 – 4),” page 13. This
switch controls phantom power for all four mic inputs.
USB2.0 port
This port allows you to connect the MultiMix to a computer for
multichannel digital audio communication.
The POWER INPUT is built
to accept only the power
supply unit provided with
your MultiMix, or an AC
power supply that has the
same specs. Others probably
will not work.
A
s we said earlier, it’s very
important that you plug in
your microphones and mute
your system before you turn
on phantom power.
I
f you connect to a computer
with a USB 1.1 port, you will
be restricted to recording and
playing back only two
channels at either 44.1kHz or
48kHz.


