


Chapter 2: Your First Session With The ADAT XT
22 ADAT XT Reference Manual
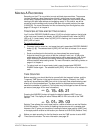
PITCH CONTROL
The Pitch function controls the speed of the tape, and thus the pitch of the audio
recorded on tape. The XT’s Pitch control has a range of -300 to +100 cents when
using a sample rate of 48kHz, and a range of -200 to +200 cents when using
44.1kHz. Use the PITCH [s] and [t] buttons to control the amount of pitch change.
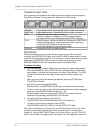
When either button is pressed once, the PITCH icon lights in the display, and the
TIME counter immediately displays the current amount of Pitch change. The Pitch
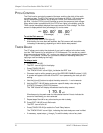
amount is displayed both as a percentage (%) and as cents.
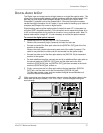
ABS
00
.
00
%
00
.
00
C
(Percentage) / (Cents)
To set the Pitch amount:
¿ Press and hold either PITCH [s] or [t].
After holding for more than two seconds, the Pitch amount will start either
increasing or decreasing, depending on which button was pressed.
TRACK DELAY
The XT allows you to delay the playback of any track in relation to the other tracks
(and the TIME counter) by a maximum of 170 milliseconds. This can be very useful
when some tracks are slightly “off”, or when you need to move a particular instrument
to get it “in the pocket”, or when you just want to create an interesting effect (like
copying a track and delaying the copy).
To delay a track:
¿ Press [EDIT VALUE].
The
EDIT
icon will light in the display.
¡ Press [TRACK DELAY].
The
TRACK DELAY
icon will light, just below the
EDIT
icon.
¬ Choose a track to edit by pressing one of the RECORD ENABLE buttons [1]–[8].
A number will appear to the left of the
EDIT
icon representing the track you are
editing.
÷ Use the [s] and [t] buttons to adjust the delay amount in .1 ms increments.
ƒ Hold the [EDIT VALUE] button and enter a specific delay value using the
[LOCATE 0] thought [LOCATE 9] buttons.
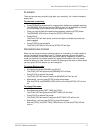
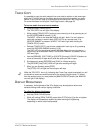
The TIME counter will display the selected track’s delay amount.
1 70. 0 mS
Simultaneously, the peak meter for the selected track will rise to indicate the
amount of track delay you have selected.
ª Repeat steps 3 and 4 for any other tracks you wish to delay.
D Press [EDIT VALUE] to exit Edit mode.
The
EDIT
icon will turn off.
« Press [TRACK DELAY] to enable the Track Delay feature.
The
TRACK DELAY
icon will light, indicating that track delays are now in effect.
» If necessary, repeat steps ¿ through ƒ to edit the delay value of any track.