


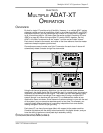

Chapter 5: Multiple ADAT-XT Operation
56 ADAT XT Reference Manual
Synchronization requires a dual male, 9 pin D connector cable for each slave to be
synchronized. Use only Alesis cables. Alesis Sync Cables are available in three
different lengths: 8", 30", and 30' from your dealer. Other types of cables may cause
incorrect commands to be received, and erratic sync performance. This connection
should be made while power is off, but the machines do not need to be turned on in
any particular order. For more about connections, refer to the section entitled
Sync
In/Out
in Chapter 3.
After you’ve connected multiple XTs and/or ADATS together and turned them on, the
master’s display will show “ID 1” (identifying itself as the number 1 machine in the
system). The second machine will display ID 2, the third ID 3, and so on. The ID
order is automatically assigned according to how the cables are hooked up. You can
re-check a machine’s ID at any time by holding [SET LOCATE] and pressing [PLAY].
J
If a slave does not display an ID number on power-up, then it does not see anything
connected to the
[SYNC IN]
jack. Check the cables and connections.
If needed, the machines will renumber their IDs if more XTs or ADATs are connected
later.
Example:
Suppose you have three XTs hooked up so that machine 1 is the
master, and machines 2 and 3 are slaves. If you turn on only machines 2 and 3,
machine 1 will not be active so machine 2 decides it’s the master (ID 1) and machine
three the only slave (ID 2). If you then turn on machine 1, the machines will renumber
themselves so that machine 1 becomes the master (ID 1), and machines 2 and 3
become the slaves (ID 2 and 3, respectively). Note that in this example, if machines 1
and 3 are turned on but machine 2 is turned off, machine 3 will not slave to machine 1
because machine 2 is turned off, so the sync signal cannot pass through it from 1 to 3.
All slave XTs will automatically be placed in External Clock mode (the EXT icon will
be lit in the CLOCK icon group). The [CLOCK SELECT] button will not function on the
slave XTs since External Clock is their only option. Simultaneously, each slave’s
CHASE icon will light whenever it is
chasing
the location of the master.
MASTER/SLAVE INTERACTION
Pressing any of the transport buttons ([PLAY], [STOP], etc.), or [AUTO REC],
[LOCATE 0] – [LOCATE 9], [ALL INPUT], [AUTO INPUT], PITCH [s] or [t] will
automatically trigger the same functions on the slave machine(s) as well. Alesis
recommends that you always initiate operations from the master, including all
transport control functions, to minimize confusion. When you press [PLAY] on the
master, the slave(s) will locate to the same timecode point and begin playing once
sync is achieved (indicated by the LOCKED icon being lit). Pressing [EJECT] on the
master ejects all slave’s tapes as well. To eject only the master’s tape, hold [SET
LOCATE] and press [EJECT] on the master.
When recording or punching in on the slaves, initiate recording on the master
but do
not have any master tracks record-enabled
(unless, of course, you need to record
tracks on the master). Any tracks that are record-enabled on the slaves will go into
record, while the master will simply
play
. This is why record enable is an independent
function for each slave. There are two other functions when the slave(s) act
independently. Formatting is initiated independently on each slave for a number of
reasons, as detailed in the next section; however, simultaneous formatting on all
slaves is possible. Digital Input can also be set independently for the slave(s) since
you may want to record via the analog inputs on some machines and via the digital
inputs on others.
ACHIEVING LOCK