


©American Audio® - www.americanaudio.us - Q-SD Instruction Manual Page 10
Q-SD FRONT PANEL - CONTROLS AND FUNCTIONS CONT.
either hear more or less of either of the two levels. Turning the Cue Mixing knob to the CUE position
(left) will allow you to hear more of the Cue level. Turning the knob to the PGM position (right) will
allow you to hear more of the Program level (main output). You may also use the Cue Mixing Control
to hear either the Cue level or the Program level exclusively. If the knob is in the full CUE position you
will only hear the cue level, if the knob is in the full PGM position you will only hear the main output.
This function is especially useful when mixing without an monitor.
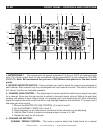
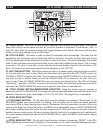
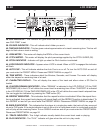
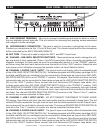
15. ZONE LEVEL VOLUME OUTPUT CONTROL - This rotary knob is used to control the zone level
volume. The zone level is not PFL, it is essentially a second master output volume with separate out-
put volume control.
16. FADER ASSIGN SWITCH - This is a five position switch that assigns a channel to the CROSS-
FADER (18). When a channel is assigned to the left side of the CROSSFADER (18) that channels
output level is routed to and controlled by the CROSSFADER (18). Sliding the CROSSFADER (18) to
left position will send the volume output of the assigned channel to the MASTER VOLUME LEVEL (5),
siding the CROSSFADER (18) to right position will cut that channels volume to MASTER VOLUME
LEVEL (5). The reverse is true for the right channel fader assign switch. When the assign switch is set
to the "OFF" position the crossfader will have no function.
17. Q-START ON/OFF SWITCH - This function works in conjunction with a compatible American DJ®
or American Audio® “Q” Start CD player. When used with a compatible CD player, you can use the
crossfader to start and stop a CD Player with the slide of the mixer’s CROSSFADER (18). The ON/OFF
“Q" START SWITCH activates the FADER “Q" START feature. When in the ON position, the FADER
“Q" START automatically returns the CD player to the preset CUE POINT.
For example; Assuming you have two compatible American Audio™ CD players or a
compatible dual CD player connected to channels A and B. When the Fader "Q" Start option
is turned on, sliding the crossfader to the far left position will trigger playback on CD player
A. When the crossfader is pushed to the far right position, playback on CD player B will
begin, and CD player A will return to the cue position. Refer to your American Audio CD
player user manual for setting CUE POINTS. Turn the ON/OFF SWITCH to the OFF
position to disengaged “Q” Start function and resume to a normal fader.
18. FEATHER FADER PLUS CROSSFADER - This fader is used to blend the output signals of
channels A and B together. When the fader is in the full left position (channel A), the output signal of
channel A will be controlled by the master volume level. The same fundamentals will apply for chan-
nel B. Sliding the fader from one position to another will vary the output signals of channels A and B
respectively. When the crossfader is set in the center position, the output signals of both the channels
A and channels B will be even.
19. CHANNEL VOLUME FADER - These faders are used to control the output signal of any source
assigned to its particular channel. However, master volume is controlled by the MASTER VOLUME
CONTROL (5).
20. CUE BUTTON - These buttons are used to activate a channels “CUE” mode. A red LED around
the Cue button will glow when a channels cue mode is activated. The Cue function sends a channels
incoming signal to the headphones. The cue level is adjusted by the CUE LEVEL KNOB (13). Be sure
the CUE MIXING KNOB (14) is set to the “CUE” position to hear a selected channel source.
21. MIC 2 VOLUME CONTROL - This knob controls the output volume of MICROPHONE 2 (53).
However, master volume is controlled by the MASTER VOLUME CONTROL (5).
22. MIC 1 VOLUME CONTROL - This knob controls the output volume of MICROPHONE 1 (1).