


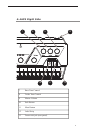


17
System Setup
Start with all devices turned off. When all power and audio
connections have been made, you can then power up all the
components in your system.
AC Power Connection
The component parts of your Personal Monitor Mixing System use
separate external power supplies.
• Connect the power supply to the 18-24 VDC Power jack
on the rear of the analog input module (does not apply
when using the Yamaha-compatible Y1 card).
• Plug the power supply into an available AC power
outlet.
• Connect the power supply to the A-16R Personal Mixer
unit.
• Plug the power supply into an available AC power
outlet.
The Personal Monitor System will be in its “on” state as long as it is
plugged into a working electrical outlet.
No on/off power switches are included. If you would like to control
the power state of your units, simply connect the power supplies to a
power strip with an on/off switch. Use that as a system power switch.
Note: The A-16CS gets its power from the A-16R when the
A-Control jacks are connected via a Cat-5 cable. No
power supply is required.
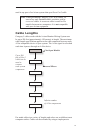
System Interconnections
A single Category 5 cable is required to connect each A-Net
compatible device in your system.
Connect a Category 5 cable from the front panel A-Net jack on the
Aviom A-Net input module (AN-16/i, AN-16/i-M, A-16T, or Y1 card)
to the A-Net In jack on the first Personal Mixer.
Connect additional A-16, A-16II or A-16R Personal Mixers with a
single Category 5 cable from the A-Net Out jack on the first Mixer to
the A-Net In jack on the next Personal Mixer. (Repeat this process for