


7
ULTRAGRAPH PRO FBQ1502/ULTRAGRAPH PRO FBQ3102/ULTRAGRAPH PRO FBQ6200
+ Try to orient yourself on a frequency whose signal
level lies in the 0 dB to -3 dB range in order to avoid
overdriving the equipment connected (e.g. power
amplifier, crossover).
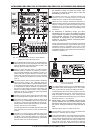
2.3.3 Subwoofer section
The LED display indicates the signal level present at the
SUB OUT connector.
The signal level present at the subwoofer output connector
can be adjusted by using the LEVEL control.
To activate the subwoofer output, please depress the
SUBWOOFER switch.
In general, the location of a subwoofer is not critical, since the
source of deeper freqencies is not easily determined. However,
to achieve optimal sound resolution, you should try to position
the subwoofer in a central location between the two main
speakers. This way, you minimize run-time differences and the
sound quality deterioration associated with them.
3. APPLICATION EXAMPLES
The flexible concept of the ULTRAGRAPH PRO models, with
the diverse possibilities in sound processing, open up an entire
range of application possibilities for you.
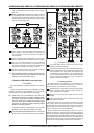
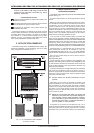
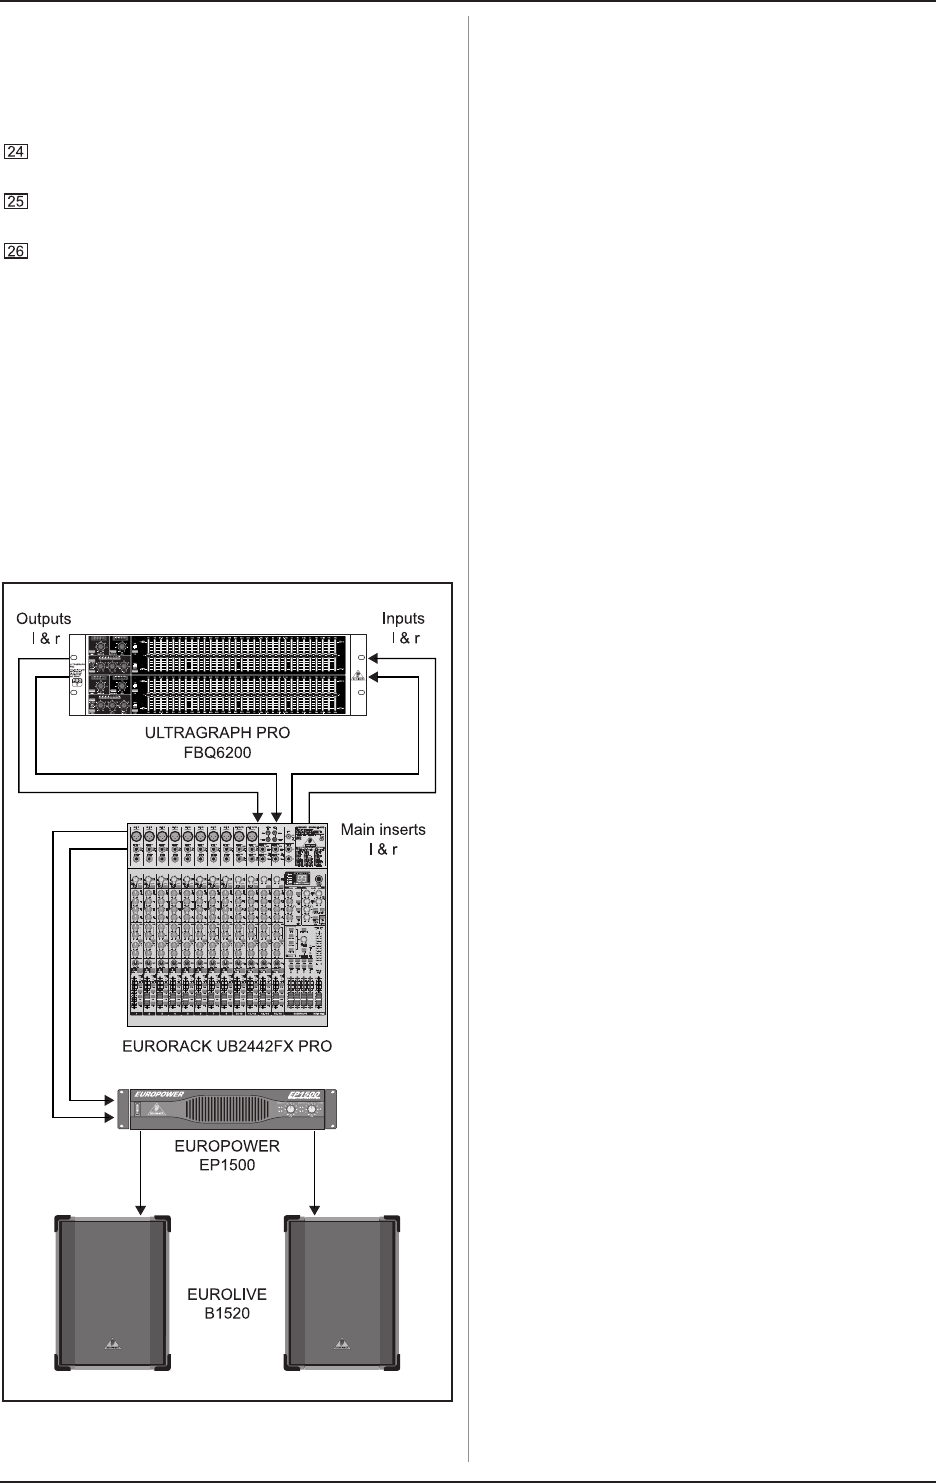
Fig. 3.1: The ULTRAGRAPH PRO FBQ6200
as master equalizer
3.1 Master equalizer in sound
reinforcement systems
This diagram shows a typical set-up with the ULTRAGRAPHPRO
models (see fig. 3.1).
To achieve optimal results, you should pay attention to several
issues:
Before you start correcting the frequency response of a setup,
it is advisable to first let the music and other sound sources run
uncorrected, as this is something that has proven itself in
practice. If distortion occurs, such overdriving is the first issue
to be overcome in your setup. Loudspeaker location is also very
important. No equalizer in this world can significantly correct the
dull sound created through reflexion of wall structures and
ceilings. Often, very dramatic improvements can be made by
simply placing and aligning speakers correctly.
If you are using an active multi-way system you should take
some run-time and phase correction measures before you work
with the ULTRAGRAPH PRO (our crossover network SUPER-XPRO
CX3400 provides all the necessary tools with its variable split
frequencies, phase reverse switches and electronic run-time
correction facility). Only after making these preliminary adjustments
should you start implementing them on your ULTRAGRAPHPRO.
Disturbing noise (e. g. mains-induced hum) as well as narrow-
band resonances should first be tackled by using the
ULTRAGRAPHPRO (also see ch. 3.2.1). You should definitely
perform all these adjustments before modifying the overall sound.
Now you have a basic setup and now its time to start fine-
tuning your sound.
Some ground rules:
A linear response curve is not ideal for every application. For
example, when dealing with the spoken word, intelligibility is what
is most important. Therefore, the transmission curve should drop
off in the bass segment of the signal because otherwise only
interference is transmitted.
In general, extremely low and high frequencies are transmitted
with much lower amplitudes. There is no sense in forcing a
small full-range speaker to reproduce frequencies below 50 Hz;
apart from a need for higher power reserves, speaker damage
will be the most likely result.
+ Always respect the physical limitations of your
system.
After setting up your system as precisely as possible to the
desired transmission curve, walk around the venue in order to
get an impression of what your signal sounds like in different
locations. Do not forget to take regular breaks while you do this,
and also try to use various program sources to truly develop a
feeling for what your system really sounds like and how the
venue carries the sound.
+ Setting up your equalizer well takes a lot of time and
patience! If you notice that only extreme settings on
your equalizer create a usable frequency response,
this is probably a good indication that a cardinal
mistake may have been committed elsewhere in
the P.A. system or room acoustics.
An equalizer is no solution for bad equipment, but it is an
extremely useful and effective sound tool for musical fine-tuning.
Fine-tuning often leads to amazing improvements in acoustic
penetration and in the overall sound quality of your entire setup.
3. APPLICATION EXAMPLES