


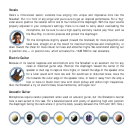


Saxophones, Flutes, and Reeds
For soprano sax, clarinet, oboe and related instruments, position the Snowball directly above and
in front of the keys between the middle of the horn and the lowest pads. Try moving the Snowball
up or down along the length of the body to adjust the balance of airy highs (toward
the mouthpiece) and cutting midrange (toward the bell). On flute, start by placing
the Snowball above the middle of the instrument, and move the diaphragm closer
to the mouthpiece if more high frequencies and breath sounds are desired. For other
members of the saxophone family, start by placing the Snowball two to six inches in
front of the lip of the bell. Angle the Snowball upward toward the mouthpiece to capture more air,
brightness, and high notes. For a mellower sound, orienting the diaphragm toward the floor will
emphasize the low range of the sax, and will tame the biting upper midrange that projects straight
out of the bell.
Additional Applications
The Snowball is an ideal desktop microphone for applications such as dictation, voice recording
and internet telephony, and of course, PODCASTING! You’ll also love it for looping dialog over your
professional or home movies.
Now, go get the Snowball connected and see how cool it really is.
Optional Accessories
The Ringer — Universal shockmount The Pop — Custom-designed pop filter
For more information on Blue Microphones and our complete line of award-winning mics, visit us on the web at www.bluemic.com
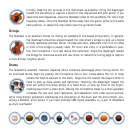
Technical Specifications
Position 2 Position 3
Acoustical Operating Principal
Polar Pattern
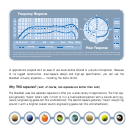
Frequency Response
Position 1
Pressure Gradient
Cardioid
40-18000Hz
Pressure Gradient
Cardioid
40-18000Hz
Pressure Gradient
Omnidirectional
40-18000Hz
1 2