


We know you hate to read manuals. So do we! But because the Snowball is such a unique recording
tool, we really hope you take the time to familiarize yourself with its features and try the suggested
application tips that are designed to help you get the most out of the Snowball. You might just
learn something too! With proper care and feeding, the Snowball will reward you with many years
of recording and performance enjoyment and it won’t end up as a pool of water on your desktop!
Now on with the show. (No refrigeration necessary.)
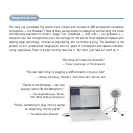
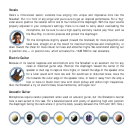
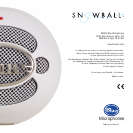
What’s that on the back?
Well, we’re glad you asked. You will find the USB output port and a three-position switch on the
rear of the Snowball. You can probably figure out what the USB port is for, but in case you can’t,
this is the place where you connect the boxy end of the USB cable — with the other end going
into, you guessed it, your computer. Now for the fun part. Just above the USB output port, you
will find a three-position switch. Viewed from left to right, the positions are as follows:
First position: Activates the cardioid capsule.
Second position: Activates the cardioid capsule with a -10dB PAD (more geek talk for a
device that reduces the output of the mic for use with loud sound sources that could cause
distortion of the signal).
Third position: Activates the omni capsule.
Snowball suggested applications
The Snowball was designed for convenient studio use without the necessity for a lot of signal pro-
cessing — or even a mic pre! Because you just connect it to your USB port, it offers a wide range
1
2
3