


Vocals
Here’s a little-known secret: vocalists love singing into unique and impressive mics like the
Snowball. Put it in front of any singer and you’re sure to get an inspired performance. For a “big”
vocal sound, position the vocalist within one to four inches of the diaphragm. With the input volume
properly adjusted in your computer’s settings, there is no need to worry about overloading the
microphone, but be sure to use a high-quality sonically neutral pop filter, such as
the Blue Pop, to control plosives and protect the diaphragm.
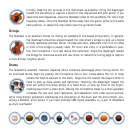
Tilt the microphone slightly upward (toward the forehead) for more projection and
head tone, straight on at the mouth for maximum brightness and intelligibility, or
down toward the chest for more robust full lows and smoother highs. We recommend starting out
in position one — or position two, which activates the -10dB PAD for real screamers.
Electric Guitar
Because of its neutral response and solid bottom end, the Snowball is an excellent mic for any
clean or distorted guitar amp. Position the diaphragm toward the center of the
speaker or dust cap to capture more highs, or toward the edge of the speaker cone
for a fuller sound with more low end. For overdriven or distorted tones, move the
mic towards the outer edge of the speaker cone, or back it away from the amp a
foot or more to blend room tone with direct pickup and soften high frequencies.
Give the Snowball a try on electric bass, blues harmonica, and organ too!
Acoustic Guitar
Microphones require careful placement when used on acoustic guitar, but the Snowball’s neutral
tone is well-suited to this task. For a balanced sound with plenty of sparkling high end, position
the diaphragm facing the neck where it joins the body (usually between the 12th and 14th frets.)