


H8180/H8181 Bass Guitar Kit
-11-
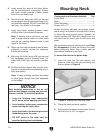
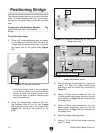
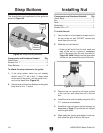
Figure 10. Example of making a pilot hole in the
neck.
5. Unclamp the neck from the body.
To determine neck mounting hole depth:
1. Secure a
9
⁄64" drill bit in the drill press chuck,
raise the table, and set the neck and fretboard
down on top of a clean piece of scrap wood
on the table.
2. Set the drill press depth stop so the tip of
the bit will ONLY drive half way through the
neck.
Note: Correctly set the depth stop or the bit
may drill through the fretboard!
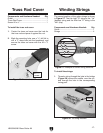
Another way to determine neck mounting hole
depth (Optional):
1. Insert the neck into the neck pocket.
2. Place the neckplate on top of the body so a
mounting hole protrudes beyond the body
and neck (see
Figure 11).
3. Insert a #10 x 1
3
/4" screw through the plate
so it hangs down to the side of the neck and
body.
4. Gently mark the screw tip depth with a pen-
cil.
Note:
You may want to cover the screw tip
marking location with masking tape to avoid
scratching the finish.
4. Insert a
3
⁄16" drill bit into each neck hole
(Figure 10). While pressing down slightly,
twist the drill bit by hand to make pilot holes
in the neck.
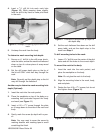
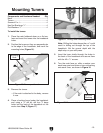
Figure 11. Example of using screw tip depth to
set depth stop.
5. Set the neck fretboard face down on the drill
press table, and set the depth stop to the
mark from Step 4
.
To drill mounting holes in the neck:
1. Lower a
9
⁄64" drill bit over the center of the pilot
holes and drill the holes to the correct depth.
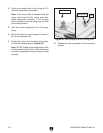
To mount the neck to the body:
1. Insert the neck into the neck pocket, and
place the neckplate on the body.
Note: Do not glue the neck to the body.
2. Align the mounting holes in the neck, body,
and neckplate.
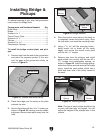
3. Fasten the four #10 x 1
3
/4" screws, but do not
final tighten them (Figure
12).
Figure 12. Example of fastening neck to body.