


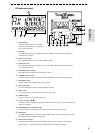


13
3. Editing
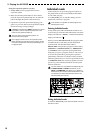
Setting the noise reduction and
program levels
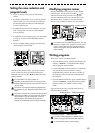
1. If you are in Play mode, press the NR-LEVEL
switch.
2. By rotating value knobs 1 or 2, or pressing the NR-
LEVEL switch, you can access the screen displays
for adjusting the noise reduction and setting the
level for each program.
3. To adjust the amount of noise reduction, use value
knob 1 (range OFF...10: shown in the MASTER/
VALUE display).
4. To adjust the level of each program, use value knob
2 (range 0...10: shown in the MASTER/VALUE
display).
5. When you finish making settings, press the EXIT
switch to return to Play mode.
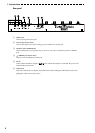
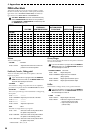
Level
Noise reduction
Instead of value knobs 1 and 2, you can also use the
cursor switches to select a parameter and use the
MASTER/VALUE switches (▲,▼) to adjust the value
of the parameter.
It is not possible to turn noise reduction off.
Depending on the guitar that you use, raising the noise
reduction setting too high may cause the sound to be cut
off at low levels.
The volume of each program will change depending on
the guitar that you use. Adjust the program level for your
guitar.
If you wish to save the noise reduction and program level
settings that you edited, you must perform the “Program
write” operation. If you turn off the power or select a
different program without writing the program, the
program you modified will revert to its previous settings.
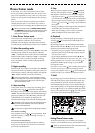
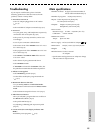
Modifying program names
Press the RENAME switch and specify the desired
program name. Use the cursor switches ( , ) to
select the character that you wish to change (the
character will blink). Then use value knob 5 (or the
MASTER/VALUE switches) to select the desired
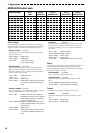
character. The available characters are shown below.
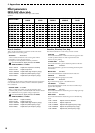
Available characters
Move between
character positions
Select characters
If you wish to save the modified program name, you must
perform the “Program write” operation. If you turn off the
power or select a different program without writing the
program, the program name you edited will revert to its
previous setting.
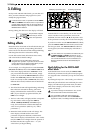
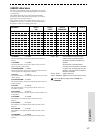
Writing programs
Here’s how to write an edited program.
1. Press the WRITE switch, and the name display will
indicate “✳WRITE✳.” The bank number display
and the program LED will blink.
2. Use the MASTER/VALUE switches (or value knob
5 and the bank switch) to select the writing
destination bank, and use the cursor switches (or
the program switch) to select the writing destina-
tion program.
3. Press the WRITE switch once again, and the display
will read “COMPLT” to indicate that the program
has been written. You will then return to Play
mode.
If you decide not to write, press the EXIT switch to
cancel the Write operation.
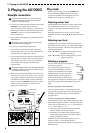
Select the bank Select the program
Select the bankSelect the program
If you write an edited program to a different program
number, the program that was overwritten will be lost.
It is not possible to write to a preset program.