


8
2. Playing the AX1000G
2. Playing the AX1000G
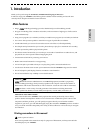
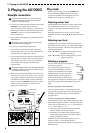
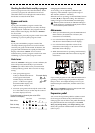
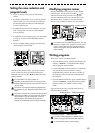
Example connections
The power must be off when you make connections.
Unintentional operation may damage your speaker
system, or cause malfunctions.
1. Connect your cables from the OUTPUT jacks of the
AX1000G to your guitar amp or mixer etc.
If you are using a mono connection, connect the L/
MONO jack. In order to take full advantage of the
AX1000G’s sound, we recommend that you use
stereo connections.
2. If you wish to use headphones, plug them into the
PHONES jack.
The output from the OUTPUT jacks will be turned off
when headphones are plugged in.
3. Connect your guitar to the INPUT jack.
4. If you wish to use the AUX IN jack, connect an
external audio device to it. Use the controls of the
connected device to adjust the volume.
5. Connect the included AC adapter to the DC 9V jack,
and plug the AC adapter into an AC outlet. When
you plug it in, the power will come on automati-
cally, and the name display will indicate the
program name.
Wrap the AC adapter cable around the cable hook. When
removing the cable from the hook, be careful not to pull
the cable with excessive force.
6. When you have finished making connections, turn
on the power of your guitar amp or mixer etc. Play
your guitar to produce sound, and check whether
connections have been made correctly. Adjust the
master level of the AX1000G and the gain or fader
controls of your guitar amp or mixer to set an
appropriate volume level.
DC9V
INPUT
PHONES
OUTPUT
AUX IN
Headphones
Audio device
Stereo-mini
Guitar
mono
Guitar amp etc.
Stereo-mini
Included AC adapter
Monaural phone plug
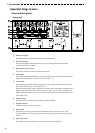
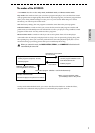
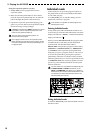
User
program
Preset
program
Play mode
When you turn on the power, the AX1000G will
always enter Play mode, and will be set to the
program and master level setting that were last
selected when the power was turned off.
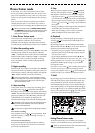
Adjusting master level
The MASTER/VALUE display will show the master
level immediately after the power is turned on, a
program is selected, and after the EXIT switch is
pressed.
When the master level is shown, you can use the
MASTER/VALUE switches (▲, ▼) to adjust the master
level.
Adjusting input level
By holding down the EXIT switch and pressing the
MASTER/VALUE switches, you will be able to adjust
the input level so that it will match the output of the
connected instrument.
EXIT + ▲ “HI IN”:For high-output pickups such as
humbucking pickups
EXIT + ▼ “LO IN”: For low-output pickups such as
single coil pickups
Selecting a program
You can select from 40 preset programs
and 40 user programs.
User and preset programs are each
organized into ten banks, with four
programs in each bank. The currently
selected bank is shown by the bank
number display, and the program is
shown by the program LEDs. When a
user program is selected, the decimal point “.” located
at the lower right of the bank number display will
light.
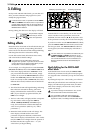
To select a program in the same bank
Press a program switch 1—4 to select the desired
program. The program LED of the selected program
will light, and the name display will indicate the
program name.
To select a program from a different bank
Press the bank switch to select the desired bank. (The
bank number display will blink.) The banks will cycle
in the order of user banks 0, 1, 2, 3 ...9, preset banks 0,
1, 2, 3...9, user banks 0, 1, 2, 3...
• Each time you press the bank switch, the bank
number display will increase by one.
• Each time you simultaneously press the bank
switch and program switch 4, the bank number
display will decrease by one.
When the desired bank number appears, press a
program switch 1—4 to select the desired
program.(The bank number display will change from
blinking to lit.)