


13
Owner’s Manual
Owner’s Manual
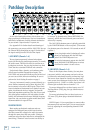
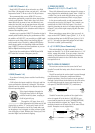
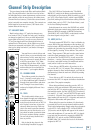
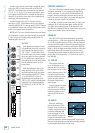
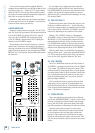
Channel Strip Description
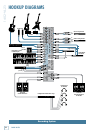
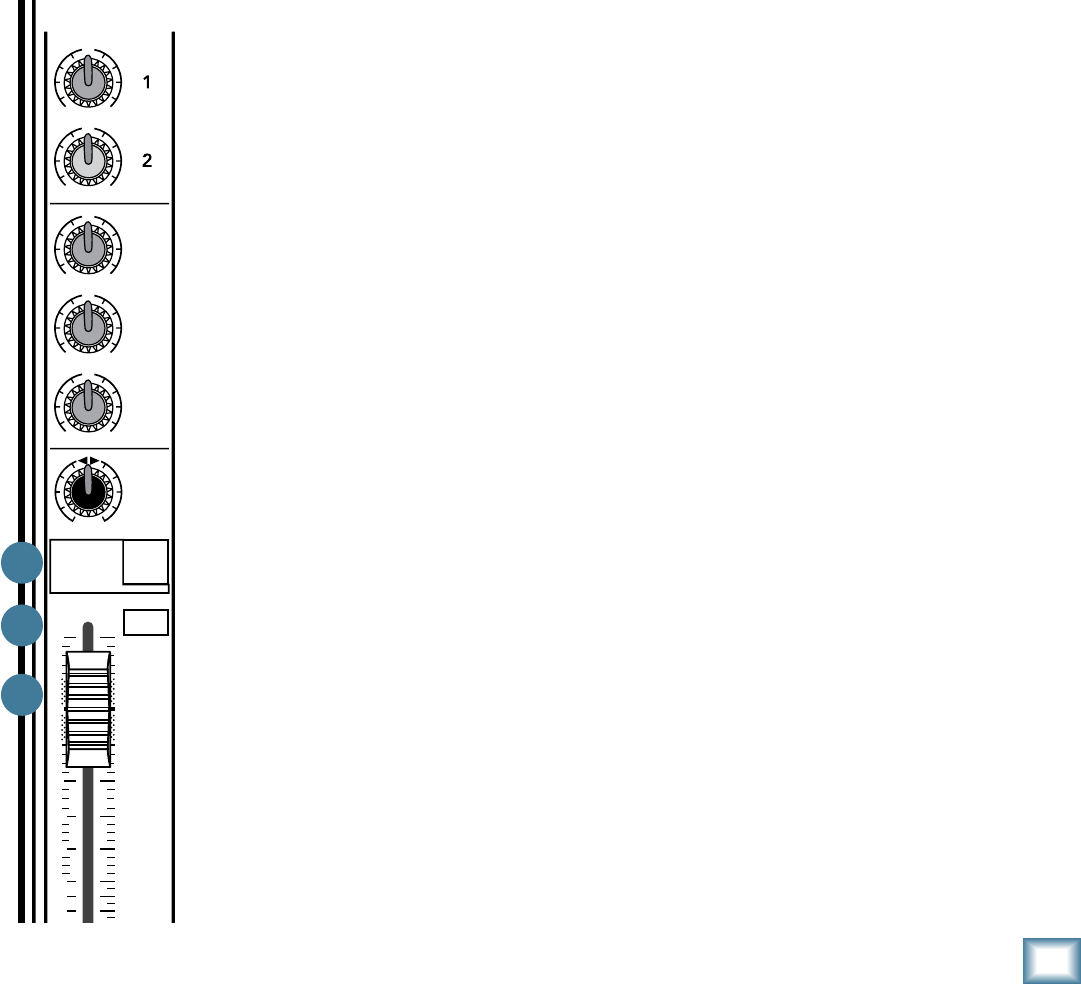
The 1402-VLZ3 has "dual-mode solo." The SOLO
MODE [35] switch in the Master section determines
which mode you'll be hearing. With the switch up, you'll
get "AFL" (After-Fader-Listen), which is post-FADER,
post-PAN, making it ideal for mixdown soloing. With the
switch down, you're in "PFL" (Pre-Fader-Listen), used
in the Level Setting Procedure.
Soloed channels are sent to the SOURCE mix, which
ultimately feeds your control room, phones and meters.
Whenever SOLO is engaged, all SOURCE selections
(MAIN MIX, ALT 3-4 and TAPE) are defeated, to allow
the soloed signal to do just that — solo!
25. MUTE/ALT 3–4
The dual-purpose MUTE/ALT 3–4 bus is a Mackie sig-
nature. When Greg was designing our first product, he
had to include a MUTE switch for each channel. MUTE
switches do just what they sound like they do. They turn
off the signal by “routing” it into oblivion. “Gee, what a
waste,” Greg reasoned. “Why not have the mute button
route the signal somewhere else useful… like a sepa-
rate stereo bus?” So MUTE/ALT 3–4 really serves two
functions — muting (often used during a mixdown or
live show), and signal routing (for multitrack and live
work) where it acts as an extra stereo bus.
To use this as a MUTE switch, all you have to do is
not use the ALT 3–4 [16] outputs. Then, whenever you
assign a channel to these unused outputs, you’ll also be
disconnecting it from the main mix, effectively muting
the channel.
To use this as an ALT 3–4 switch, all you have to do
is connect the ALT 3–4 outputs to whatever destination
you desire. Two popular examples:
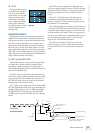
When doing multitrack recording, use the ALT 3–4
outputs to feed your multitrack. With most decks, you
can mult the ALT 3–4 outputs, using Y-cords or mults, to
feed multiple tracks. So, take ALT OUTPUT L and send
it to tracks 1, 3, 5 and 7, and ALT OUTPUT R and send it
to tracks 2, 4, 6 and 8. Now, tracks that are in Record or
Input modes will hear the ALT 3–4 signals, and tracks in
Playback or Safe modes will ignore them.
When doing live sound or mixdown, it’s often handy
to control the level of several channels with one knob.
That’s called subgrouping. Simply assign these channels
to the ALT 3–4 mix, engage ALT 3–4 in the SOURCE
[33] matrix, and the signals will appear in the control
room and headphones. If you want the ALT 3–4 signals
to go back into the main mix, engage the ASSIGN TO
MAIN MIX [37] switch, and the CONTROL ROOM/
SUBMIX fader [34] controls the levels of all channels
assigned to ALT 3–4.
The ten channel strips look alike, and function identi-
cally. The only difference is that the six on the left are
for individual mics or mono instruments, and have more
gain available, while the next four are for either stereo
or mono line-level sources. (Each of the stereo channel
strips is actually two complete circuits. The controls are
linked together to preserve stereo.) We’ll start at the
bottom and work our way up…
“U” LIKE UNITY GAIN
Mackie mixers have a “U” symbol on almost every
level control. This “U” stands for “unity gain,” meaning
no change in signal level. Once you have adjusted the
input signal to line-level, you can set every control at
“U” and your signals will travel through the mixer at
optimal levels. What’s more, all the labels on our level
controls are measured in decibels (dB), so you’ll know
what you’re doing level-wise if you choose to change a
control’s settings.
You won’t have to check it here and
check it there, as you would with some
other mixers. In fact, some don’t even
have any reference to actual dB levels
at all! Ever seen those “0–10” fader
markings? We call these AUMs (Arbi-
trary Units of Measurement), and they
mean nothing in the real world. You
were smart — you bought a Mackie.
23. CHANNEL FADER
These faders control the channel’s
level… from off, to unity gain, on up
to 10 dB of additional gain. Channels 1
through 6 use mono faders, and chan-
nels 7 through 14 use stereo faders,
and may feel slightly different. Not a
problem.
24. SOLO
This lovable switch allows you to
hear signals through your headphones
or control room without having to
route them to the main mix or ALT 3-4
mix. You don’t even have to have the
channel’s fader turned up. Folks use
solo in live work to preview channels
before they are let into the mix, or to
just check out what a particular chan-
nel is up to anytime during a session.
You can solo as many channels at a
time as you like.
Solo is also the key player in the
Level-Setting Procedure on page 3.
M
I
C
G
A
I
N
0
U
60
-
1
0
d
B
V
+15dB -45dB
M
I
C
G
A
I
N
0
U
60
-
1
0
d
B
V
+15dB -45dB
M
I
C
G
A
I
N
0
U
60
-
1
0
d
B
V
+15dB -45dB
M
I
C
G
A
I
N
0
U
60
-
1
0
d
B
V
+15dB -45dB
M
I
C
G
A
I
N
0
U
60
-
1
0
d
B
V
+15dB -45dB
M
I
C
G
A
I
N
0
U
60
-
1
0
d
B
V
+15dB -45dB
U
OO
+10
U
OO
+20
U
OO
+20
U
O
O
+15
U
O
O
+15
U
O
O
+15
U
O
O
+15
U
O
O
+15
U
O
O
+15
U
O
O
+15
U
O
O
+15
U
O
O
+15
U
O
O
+15
U
O
O
+15
U
O
O
+15
U
O
O
+15
U
O
O
+15
U
O
O
+15
U
O
O
+15
U
O
O
+15
U
O
O
+15
U
O
O
+15
U
O
O
+15
U
+15-15
U
+15-15
U
+15
-15
U
+15-15
U
+15-15
U
+15
-15
U
+15-15
U
+15-15
U
+15
-15
U
+15-15
U
+15-15
U
+15
-15
U
+15-15
U
+15-15
U
+15
-15
U
+15-15
U
+15-15
U
+15
-15
U
+15-15
U
+15-15
U
+15
-15
U
+15-15
U
+15-15
U
+15
-15
U
+15-15
U
+15-15
U
+15
-15
U
+15-15
U
+15-15
U
+15
-15
dB
30
20
10
OO
40
50
5
5
U
60
10
dB
30
20
10
OO
40
50
5
5
U
60
10
dB
30
20
10
OO
40
50
5
5
U
60
10
dB
30
20
10
OO
40
50
5
5
U
60
10
dB
30
20
10
OO
40
50
5
5
U
60
10
dB
30
20
10
OO
40
50
5
5
U
60
10
dB
30
20
10
OO
40
50
5
5
U
60
10
dB
30
20
10
OO
40
50
5
5
U
60
10
dB
30
20
10
OO
40
50
5
5
U
60
10
dB
30
20
10
OO
40
50
5
5
U
60
10
dB
30
20
10
OO
40
50
5
5
U
60
10
dB
30
20
10
OO
40
50
5
5
U
60
10
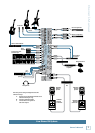
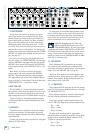
MIC
2
MIC
3
MIC
4
MIC
5
MIC
6
BAL
OR
UNBAL
BAL
OR
UNBAL
BAL
OR
UNBAL
BAL
OR
UNBAL
BAL
OR
UNBAL
BAL
OR
UNBAL
AUX SEND
1
2
1
2
RIGHT
LEFT/
MONO
ALL BAL/UNBAL
BAL/UNBAL
L
R
LINE IN 1 LINE IN 2
LOW CUT
75 Hz
18dB/OCT
LOW CUT
75 Hz
18dB/OCT
LINE IN 3
LOW CUT
75 Hz
18dB/OCT
LINE IN 4
LOW CUT
75 Hz
18dB/OCT
LOW CUT
75 Hz
18dB/OCT
LINE IN 5 LINE IN 6
LOW CUT
75 Hz
18dB/OCT
GAINGAIN GAIN GAIN GAIN GAIN
LINE IN 7-8
LINE IN 9-10
LINE IN 11-12
LINE IN 13-14
AUX
HI
12kHz
MID
2.5kHz
LOW
80Hz
EQ
PAN
AUX
EQ
PAN
AUX
EQ
PAN
AUX
EQ
PAN
AUX
EQ
PAN
AUX
EQ
PAN
AUX
EQ
PAN
AUX
EQ
PAN
AUX
EQ
PAN
AUX
EQ
PAN
SOLO
1
MUTE
ALT 3
–
4 ALT 3
–
4 ALT 3
–
4 ALT 3
–
4 ALT 3
–
4 ALT 3
–
4 ALT 3
–
4 ALT 3
–
4 ALT 3
–
4
L R
HI
12kHz
MID
2.5kHz
LOW
80Hz
SOLO
2
MUTE
L R
HI
12kHz
MID
2.5kHz
LOW
80Hz
SOLO
3
MUTE
L R
HI
12kHz
MID
2.5kHz
LOW
80Hz
SOLO
4
MUTE
L R
HI
12kHz
MID
2.5kHz
LOW
80Hz
SOLO
5
MUTE
L R
HI
12kHz
MID
2.5kHz
LOW
80Hz
SOLO
6
MUTE
L R
HI
12kHz
MID
2.5kHz
LOW
80Hz
SOLO
7-8
MUTE
L R
HI
12kHz
MID
2.5kHz
LOW
80Hz
SOLO
9-10
MUTE
L R
HI
12kHz
MID
2.5kHz
LOW
80Hz
SOLO
11-12
MUTE
L R
HI
12kHz
MID
2.5kHz
LOW
80Hz
SOLO
13-14
MUTE
ALT 3
–
4
L R
L
MONO
MONO
MONO
MONO
R
BAL
OR
UNBAL
L
R
BAL
OR
UNBAL
L
R
BAL
OR
UNBAL
L
R
BAL
OR
UNBAL
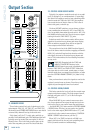
TAPE
INPUT
TAPE
OUTPUT
L
R
L
R
20
10
7
4
2
0
2
4
7
10
20
30
LEVEL
SET
LEFT RIGHT
MAIN OUT
ALT 3–4
TAPE
MAIN MIX
ASSIGN
TO MAIN MIX
SOLO
MODE
LEVEL SET (PFL)
NORMAL (AFL)
C-R/SOURCE
PO48V WER
RUDE
SOLO
LIGHT
MAIN MIXCTL ROOM /SUBMIX
0dB=0dBu
LEVELLEVELLEVEL
-
10
LEVEL
+4
-
10
+4
-
10
+4
-
10
+4
MIC
1
X
D
R
M
I
C
P
R
E
X
D
R
M
I
C
P
R
E
X
D
R
M
I
C
P
R
E
X
D
R
M
I
C
P
R
E
X
D
R
M
I
C
P
R
E
X
D
R
M
I
C
P
R
E
23
24
25