


1
Owner’s Manual
Owner’s Manual
Whatever your selection, you can also use the control
room outputs for other applications. Its sound quality is
just as impeccable as the main outputs. It can be used
as additional main mix output, which may sound silly
since there are already three, but this one has its own
level control. However, should you do something like
this, be sure that you do not engage a SOLO switch, as
that will interrupt your SOURCE selection.
35. SOLO MODE (AFL/PFL)
Engaging a channel’s SOLO [24] switch will cause
this dramatic turn of events: Any existing SOURCE [33]
matrix selections will be replaced by the SOLO signal,
appearing at the control room outputs, phones outputs,
and meter. The audible SOLO levels are then controlled
by the CONTROL ROOM / SUBMIX [34] fader. The
SOLO levels appearing on the right meter display are
not controlled by anything — you wouldn’t want that.
You want to see the actual channel level on the meter
display regardless of how loud you’re listening.
With this SOLO MODE switch in the up position,
you're in AFL mode, meaning After-Fader-Listen. You'll
hear the output of the soloed channel and it will follow
the GAIN, EQ, FADER and PAN settings. It's similar to
muting all the other channels, but without the hassle.
Use AFL mode during mixdown.
With the SOLO MODE switch in the down position,
you're in PFL mode, meaning Pre-Fader-Listen (post
EQ). This is required for the Level Setting Procedure,
and is handy for quick spot-checks of channels, espe-
cially ones that have their faders turned down.
In either mode, SOLO will not be affected by a
channel's MUTE/ALT [25] switch position.
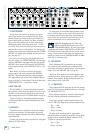
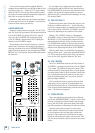
36. RUDE SOLO LIGHT
This flashing Light Emitting Diode serves two pur-
poses — to remind you that at least one channel is
in SOLO, and to let you know that you’re mixing on a
Mackie. No other company is so concerned about your
level of SOLO awareness. If you work on a mixer that
has a solo function with no indicator lights, and you
happen to forget you’re in solo, you can easily be tricked
into thinking that something is wrong with your mixer.
Hence the RUDE SOLO LIGHT. It’s especially handy at
about 3 a.m. when no sound is coming out of your moni-
tors but your multitrack is playing back like mad.
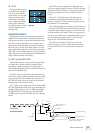
37. ASSIGN TO MAIN MIX
Let’s say you’re doing a live show. Intermission is near-
ing and you’ll want to play a soothing CD for the crowd
to prevent them from becoming antsy. Then you think,
“But I have the CD player plugged into the TAPE inputs,
and that never gets to the main outputs!” Oh, but it
does. Simply engage this switch and your SOURCE [33]
matrix selection, after going through the CONTROL
ROOM / SUBMIX [34] fader, will feed into the main mix,
just as if it were another stereo channel.
Another handy use for this switch is to enable the ALT
3-4 mix to become a submix of the main mix, using the
CONTROL ROOM/SUBMIX fader as its level control.
Side effects: (1) Engaging this switch will also feed
any soloed channels into the main mix, which may be
the last thing you want. (2) If you have MAIN MIX as
your SOURCE matrix selection and then engage ASSIGN
TO MAIN MIX [37], the main mix lines to the SOURCE
matrix will be interrupted to prevent feedback. Then
again, why on earth would anyone want to assign the
main mix to the main mix?
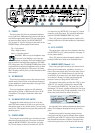
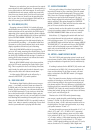
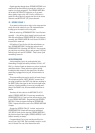
38. METERS – MANY DISPLAYS IN ONE!
The 1402-VLZ3’s peak metering system is made up of
two columns of twelve LEDs. Deceptively simple, consid-
ering the multitude of signals that can be monitored by
it.
If nothing is selected in the SOURCE [33] matrix and
no channels are in SOLO [24], the meters will just sit
there and do nothing. To put them to work, you must
make a selection in the SOURCE matrix (or engage a
SOLO switch).
Why? You want the meter display to reflect what the
engineer is listening to, and as we’ve covered, the engi-
neer is listening either to the control room outputs or
the phones outputs. The only difference is that while the
listening levels are controlled by the CONTROL ROOM
/ SUBMIX [34] fader, the meters read the SOURCE mix
before that control, giving you the real facts at all times,
even if you’re not listening at all.
Thanks to the 1402-VLZ3’s wide dynamic range,
you can get a good mix with peaks flashing anywhere
between –20 and +10 dB on the meters. Most ampli-
fiers clip at about +10 dB, and some recorders aren’t so
forgiving either. For best real-world results, try to keep
your peaks between “0” and “+7”.
You may already be an expert at the world of “+4” (+4
dBu=1.23 V) and “–10” (–10 dBV=0.32 V) operating
levels. Basically, what makes a mixer one or the other
is the relative 0 dB VU (or 0 VU) chosen for the meters.
A “+4” mixer, with a +4 dBu signal pouring out the back
will actually read 0 VU on its meters. A “–10” mixer,
with a –10 dBV signal trickling out, will read 0 VU on its
meters. So when is 0 VU actually 0 dBu? Right now!