


LX-300 Maintenance
Overview 23
Recommended Schedule 23
Inspection and Maintenance Procedure 23
Operational Testing 24
Dust, heat, humidity and power surges are the most significant dangers to the system and its components. For best
performance, the Matrix3 should be operated in a cool, low-dust, low-humidity environment. In most operating envir-
onments, periodic inspection of the LX-300 will ensure its longevity.
Overview
Skills Required
Visual inspection of hardware; tightening of connectors; power-cycling of LX-300s.
Required Tools and Components
• #2 Philips screwdriver.
• Soft cloth and glass cleaner.
Recommended Schedule
In most environments, a monthly inspection will be adequate.
Where conditions allow for extreme temperatures, humidity or dust infiltration; or where there is a possibility of water
leakage; or where the system may be subjected to vibration, we recommend a weekly or even daily inspection.
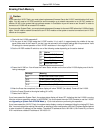
Table 1. Inspection Schedule
Inspection FrequencyEnvironment
MonthlyDry, cool, dust-free, no vibration
Weekly or DailyConcerns for temperature, humidity, dust levels, vibration
DailyPossibility of burst water mains, flooding, severe vibration,
extreme heat or humidity, high levels of dust
Inspection and Maintenance Procedure
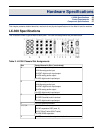
1. Check that the ventilation blowers are working by feeling for airflow at each vent. The blower vents are located
on the front panel, to either side of the displays.
If there is low or no airflow, replace the LX-300 and return the non-functional chassis to Meyer Sound for servicing.
LX-300 replacement procedures are described in Matrix3 Repair Procedures (p. 19). Shipping instructions are
described in the Appendix (p. 47).
2. Inspect all cable connections made at the rear of the unit. All connectors must be secure in their sockets.
Tighten any connections that have become loose. Do not over-tighten.
If a module socket is damaged, replace the module. module replacement procedures are described in Matrix3 Repair
Procedures (p. 19).
3. Inspect the module and chassis mounting points. Each module is secured using two or four captive machine
screws located at the top and bottom edges of the module. Finger-tighten to snug the captive machine screws
firmly. Do not over-tighten.
23