


27
EN
2
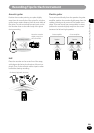
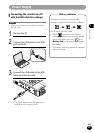
Initial Settings before Using the Recorder
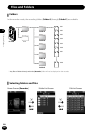
When the recorder is turned on in the following cases, [Set time & date] is
displayed.Set the clock according to the procedure below, beginning with step 1.
•
When using the recorder for the first time
•
When inserting the battery after not using the recorder for a long time
•
When the clock has not been set
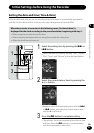
1
Select the setting item by pressing the
9
or
0
button.
•
Select the item you want to set from "Year", "Month",
"Day", "Hour", and "Minute" so that the item flashes.
2
Select the current date or time by pressing the
+
or
−
button.
•
Repeat to select the next setting item with the
9
or
0
button and select the current date or time
with the
+
or
−
button.
3
Press the
OK
button to complete setting.
•
The recorder clock starts operating from the set date
and time. Press the
OK
button in synchronization
with the time signal or other clock.
Setting the date and time [Time & Date]
When the date and time are set, the recording time information is automatically recorded for
each file. Set the date and time in advance for easy management of recorded files.
1
2
3
Initial Settings before Using the Recorder