12
En
m HOT CUE/SAMPLER buttons 1 – 5
Hot cue mode
Press:
Use this to set, play and call out hot cues.
[SHIFT] + press:
Delete the hot cue set for that button.
= Using hot cues (p.19)
Sampler mode
Press:
When one of [HOT CUE/SAMPLER] buttons 1 to 3 is pressed, play-
back of the sample starts.
The bank switches each time [HOT CUE/SAMPLER] button 4 or 5 is
pressed.
[SHIFT] + press:
When one of [HOT CUE/SAMPLER] buttons 1 to 3 is pressed, play-
back of the sample stops.
=
Using the sampler function (p.19)
Mixer section
CUE
BACK
TRIM
MAXMIN
LOAD PREPARE
BROWSE
SAVE
ZOOM
REC
PANEL
AREA
MIXING
MASTERCUE
MASTER
HI
MIN MAX
MID
MIN MAX
LOW
MIN MAX
EQ EQ
1
CUE
TRIM
MAXMIN
HI
MIN MAX
MID
MIN MAX
LOW
MIN MAX
2
10
9
8
7
6
5
4
3
2
1
0
10
9
8
7
6
5
4
3
2
1
0
FADER START
ONOFF
FADER START
ONOFFONOFF
THRU
C.F.REV
HEADPHONES
MAXMIN
LEVEL
MAXMIN
LEVEL
LEVEL
MASTER
C.F.REV
12
5
4
cd
7
6
3
b
2
1
9
8
a
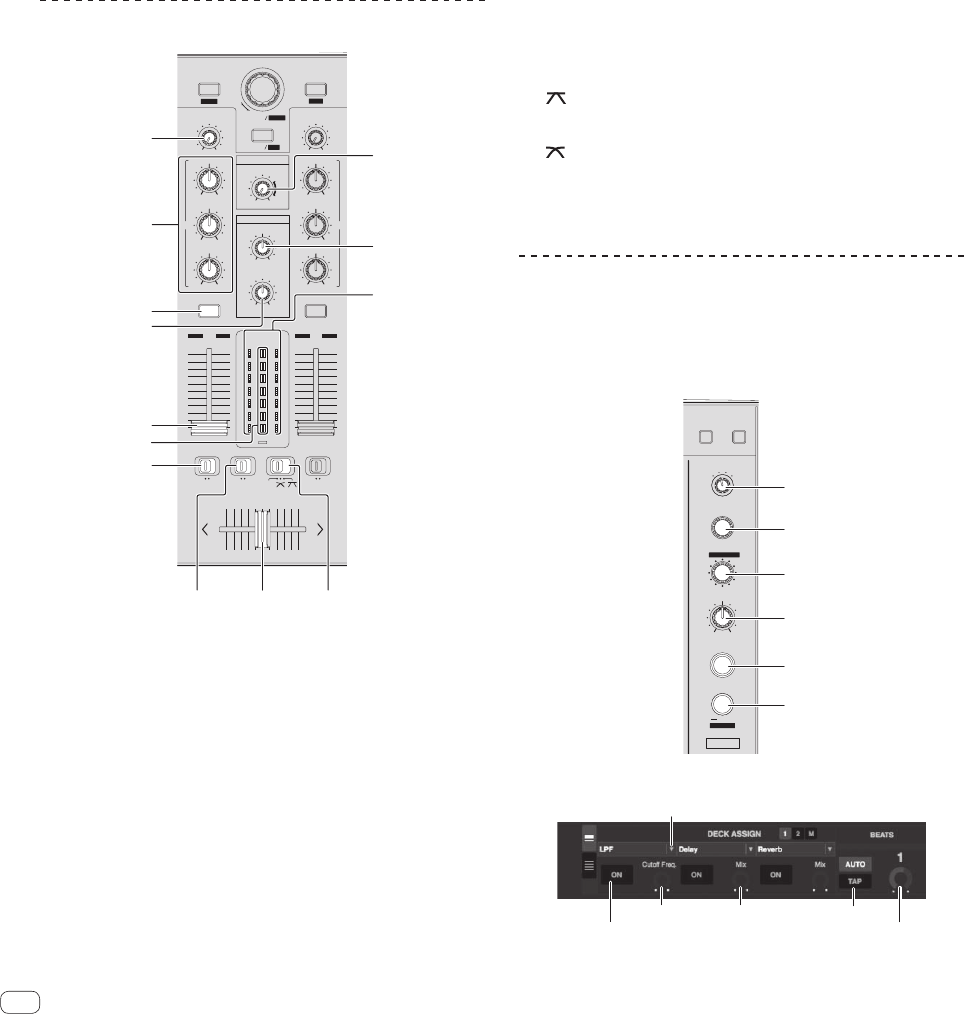
1 TRIM control
Adjusts the individual channel output gain.
2 EQ (HI, MID, LOW) controls
Boosts or cuts frequencies for the different channels.
3 Headphones CUE button
Press:
The sound of channels for which the headphones [CUE] button is
pressed is output to the headphones.
! When the headphones [CUE] button is pressed again, monitoring
is canceled.
4 MASTER LEVEL control
Adjusts the master sound level output.
5 HEADPHONES MIXING control
Adjusts the balance of the monitor volume between the sound of the
channels for which the headphones [CUE] button is pressed and the
sound of the master channel.
6 HEADPHONES LEVEL control
Adjusts the audio level output from the [PHONES] terminal.
7 Channel fader
Adjusts the level of audio signals output in each channel.
8 Channel Level Indicator
Displays the sound level of the respective channels before passing
through the channel faders.
9 Master level indicator
Displays the master output’s audio level.
a FADER START switch
These turn the fader start function on/off.
= Starting playback using the fader (Fader Start) (p.20)
b C.F. REV switch
This reverses the channels assigned to the left and right sides of the
crossfader.
[ON]: The left side of the crossfader is set to deck (2), the right side
to deck (1).
[OFF]: The left side of the crossfader is set to deck (1), the right side
to deck (2).
c Crossfader curve selector switch
This switches the crossfader curve characteristics.
[ ]: Set here for a curve that rises steeply. (When the crossfader
moves away from either the left or right edge, the sound is immedi-
ately output from the opposite side.)
[ ]: Set here for a curve that rises gradually.
[THRU]: Choose this when you do not want to use the crossfader.
d Crossfader
Switches between the audio output of the left and right decks.
Effect section
The effect section is used to control two effect units (FX1 and FX2).
There are controls and buttons for operating FX1 on the left side of the
controller, controls and buttons for operating FX2 on the right side of the
controller. Also, the [FX CH SELECT] control is used to set the channel to
which the effect is applied.
BROWSE PREPARE
EFFECT SELECT
ON / OFF
FX2
FX CH SELECT
1
2 MASTER
MIC
/AUX
LEVEL / DEPTH
FX MODE
AUTO
TAP
BEATS
/
PARAMETER
1
2
3
4
5
6
MULTIMODE
FX ON/OFF
PARAMETER 1 PARAMETER 3 TAP
BEATS


