


Music Lab Installation Guide
11
• External Playback/Recording Device(s)
• Visual Monitor(s)
• Computer
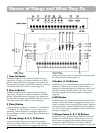
• MTLC-16
• Audio Monitor(s)
Test the Teacher’s Station
A) Set the output level on the teacher’s instrument to maximum (this gives the best signal-to-noise response.)
B) Set the “Mic”, “Inst”, and “Phones” sliders on the MTLC-16 to their maximum setting.
C) Put on the teacher’s headset and play a few notes on the teacher’s instrument. You should hear what you are
playing. If you do not hear anything, check the teacher’s instrument and teacher’s headset connections.
D) Press the “Mic” button on the MTLC-16 and say something. You should hear what you are saying. If you do
not hear anything, check the teacher’s headset connections.
Test Student Stations
A) Press the “All” button on the MTLC-16.
B) Play a few notes on the teacher’s instrument while an assistant listens at student station #1. The assistant
should hear what you are playing. If the assistant does not hear anything, check the student communication
box to MTLC-16 “1” connections.
C) Have an assistant adjust the output level on student instrument #1 to maximum (this gives the best signal-to-
noise response.)
D) Have the assistant play a few notes on student instrument #1. The assistant should hear what he or she is
playing. If the assistant does not hear anything, check the student instrument to student communication box
connections.
E) Have the assistant say something. The assistant should hear what he or she is saying.
F) Make adjustments in headphone and microphone levels with the level-control knobs on the side of the student
communication box. All communication boxes should be adjusted to equal audio levels.
G) Repeat steps B – F above for each remaining student station.
Secure Equipment and Cables
If all of the components are functioning properly, finalize the placement of all equipment.
•
Attach each student communication box to the furniture or student keyboard, near the headphone jack on the
instrument, using screws or velcro.
•
Secure all power outlets and power cords.
•
Secure all communication cables by either tying them together or placing them in wiring channels to avoid haz-
ards in the classroom setting.
•
Care should be taken to make sure that all cords and cables be secured in a neat and orderly fashion to avoid trip-
ping over them and pulling them out of their sockets, which can cause damage.