


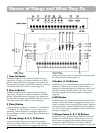

teacher’s microphone (page 21).
8 [Mute] Button
Silences all student instruments. When this button is
engaged, students can only listen to the teacher’s instru-
ment and microphone, or external audio material via
“Tape In” or “Aux In” (page 25).
9 [Mic] Button
Activates the teacher’s microphone. When this button is
engaged, the selected student(s) or group(s) can listen to
the teacher’s microphone (page 20).
10 [Student Broadcast] Button
Broadcasts two-way communication between teacher and
selected student(s) to all headphones. When this button is
engaged, selected student(s) can listen to, talk to, and play
for (or along with) the teacher while the remaining stu-
dents listen (page 23).
11 [Phones] Slider
Adjusts the teacher’s headphones level. Slide the slider
towards the top of the MTLC-16 to increase the level and
slide the slider towards the bottom of the MTLC-16 to
decrease the level (page 19).
12 [Inst] Slider
Adjusts the teacher’s instrument level. Slide the slider
towards the top of the MTLC-16 to increase the level and
slide the slider towards the bottom of the MTLC-16 to
decrease the level (page 19).
13 [Mic] Slider
Adjusts the teacher’s microphone level. Slide the slider
towards the top of the MTLC-16 to increase the level and
slide the slider towards the bottom of the MTLC-16 to
decrease the level (page 19).
14 [Tape In/Aux In] Slider
Adjusts the “Tape In” and “Aux In” levels. Slide the slid-
er towards the top of the MTLC-16 to increase the level
and slide the slider towards the bottom of the MTLC-16 to
decrease the level (page 24).
15 [Mon. Out] Slider
Adjusts the MTLC-16’s monitor output level. Slide the
slider towards the top of the MTLC-16 to increase the
level and slide the slider towards the bottom of the
MTLC-16 to decrease the level. This slider is only active
when an external recording device and/or an external
speaker system is connected to the MTLC-16 via the “Rec.
Out” and “Mon. Out” jacks respectively (page 25-26).
16 [Power Switch]
Turns the MTLC-16 on and off.
17 [Power Jack]
Connects the MTLC-16 to the supplied AC power adapter.
18 [Mon. Out] Jacks
Connect the MTLC-16 to an external speaker system (e.g.
stereo power-amp with speakers) (page 10).
19 [Rec. Out] Jacks
Connect the MTLC-16 to an external stereo recording
device (e.g. tape recorder, CD recorder, or hard disk
recorder) (page 10).
20 [Aux. In]/[Tape In] Jacks
Connect the MTLC-16 to external stereo audio sources
(e.g. tape player, CD player, or rhythm machine) (page
10).
21 [Teacher Instrument] Jacks
Connect the MTLC-16 to the teacher’s instrument. (page
9).
22 [To Slave] Connector
Connects the MTLC-16 (“Master”) to another MTLC-16
(“Slave”) for a total of 32 student stations (page 10).
23 [To Computer] Connector
Connects the MTLC-16 to a computer. When a computer
is connected to the “To Computer” connector, all of the
MTLC-16’s buttons can be controlled via computer (page
10).
24 Student Instrument [1-16] Connectors
Connect the MTLC-16 to all student stations via RJ-45
cables and MTLC-1 Student Connector Boxes (page 9).
25 [Master On/Off] Switch
Toggles between “Master” and “Slave” status. When this
button is engaged, the MTLC-16 functions as the “Master”
communication console. When this button is not
engaged, the MTLC-16 functions as the “Slave” communi-
cation console (page 10).
26 [To Expander] Connector
Connects the MTLC-16 to another MTLC-16 for a total of
32 student stations (page 10).
27 [Teacher] Headset Jacks
Connect the teacher’s headset microphone (blue plug) and
teacher’s headset stereo phones (black plug).
Names of Things and What They Do
7