


14
ENGLISH
Operating the MDR6
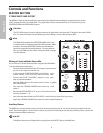
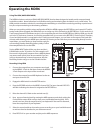
Using The HDM (HARD DISK MODE)
The MDR6 includes an exclusive HDM (HARD DISK MODE) that has been designed to interface with computer based
hard disk recorders. Never before have such flexible routing and monitoring been included in such a small mixer. The
HDM provides a seamless solution for recording and overdubbing on a hard disk recorder by providing a special record
bus plus unique monitoring to solve latency problems.
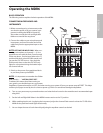
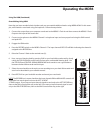
When you are working with the mixer configured to HDM, the MDR6 engages the RECORD bus and a special 2-Track lis-
tening mode. When engaged, the HDM allows you to assign any of the channels to the RECORD bus. In this mode, the 2-
Track output (located in the Master section) is now outputting the mix from the RECORD bus. While in HDM you can still
mix in the 2-Track return, however, it will not be recorded since it is not sent to the RECORD (2-Track Out) bus. Therefore,
if your hard disk recorder is connected to the 2-Track Inputs and Outputs, you can listen to the output of the hard disk
recorder while listening to the MDR6 input channels. By listening to the tracks that you are recording directly from the
input faders, you avoid having to loop back the track you
are recording, thereby eliminating latency delays. Follow
the examples below to use the HDM.
Set the MDR6 INPUT faders all the way down and the L
& R MIX faders to the “0” position. For this example, we’ll
first record a rhythm track sequence from a MIDI keyboard
(any stereo track will do), then do an overdub. If you are
using an imported loop or internal sequencer, skip the
Recording section and go on to the Overdub section.
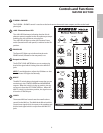
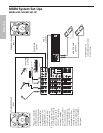
Recording Using HDM
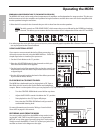
1. Connect the output from your computer sound card
to the MDR6’s 2-Track In and then connect the MDR6’s
2-Track Output to the input of the sound card.
2. Connect the outputs from a MIDI keyboard to the ste-
reo inputs channels 5/6.
3. Engage the HDM switch in the MASTER section.
4. Press the RECORD switch on the MDR6’s channel 5/6. The input channel’s REC LED
will flash indicating the channel is assigned to the RECORD bus.
5. Raise the channel 5/6 fader to the nominal area (0 ).
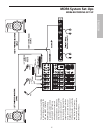
6. Now, test your listening level by starting the MIDI sequencer and slowly raising the
Control Room output level until you have set a comfortable listening level. If the
sound is too low, raise the output level of your keyboard. If the sound is distorted,
lower the output level of your keyboard.
7. Select the record enable on the tracks you are recording to on your hard disk record
-
er and set a level as described in your software manual.
8. Press REC/PLAY on your recorder and play on the MIDI sequencer.
�
�
�
�
�
�
�
�
PAN
0
L R
HF
12K
0
15
1010
55
15
MF
2.5K
15
1010
5
15
0
5
0
LF
80Hz
0
15
1010
5
15
5
0
30
5
-26
5
-26
60
+26
60
+26
MONO
MONO OUT
AUX OUT
LINE IN
AUX RET
LEFT/MONO
RIGHT
CR OUT
LEFT
RIGHT
MIX OUT
LEFT
RIGHT
LINE IN
AUX RETURN
C/ROOM
+PHONES
LEFT RIGHT LEFT RIGHT
2T IN 2T OUT
MIX/2T
PA
N
0
L R
HF
12K
0
15
1010
55
15
MF
2.5K
15
1010
5
15
0
5
0
LF
80Hz
0
15
1010
5
15
5
0
30
BAL
0
L R
HF
12K
0
15
1010
55
15
MF
2.5K
15
1010
5
15
0
5
0
LF
80Hz
0
15
1010
5
15
5
0
BAL
0
L R
HF
12K
0
15
1010
55
15
MF
2.5K
15
1010
5
15
0
5
0
LF
80Hz
0
15
1010
5
15
5
0
5
0 1
0
5
0 1
0
2TK TO RETURN
5
0 1
0
5
0 1
0
AUX
0 10
AUX
0 10
AUX
0 10
AUX
0 10
GAIN
CLIP
GAIN
CLIP
3/L
4/R
5/L
6/R
10
5
0
10
5
20
30
40
10
5
0
10
5
20
30
40
15 15
10
5
0
10
5
20
30
40
10
5
0
10
5
20
30
40
15 15
10
5
0
10
5
20
30
40
10
5
0
10
5
20
30
40
15 15
10
5
0
10
5
20
30
40
10
5
0
10
5
20
30
40
15 15
10
5
0
10
5
20
30
40
10
5
0
10
5
20
30
40
10
5
0
10
5
20
30
40
15
15
15
HARD
DISK
_
_
_
_
_
_
_
_
_
_
_
_
_
_
_
_
_
_
_
_
_
_
_
_
_
_
_
_
_
_
_
_
_
_
_
_
_
_
_
_
_
_
_
_
_
_
_
_
CHANNEL 1CHANNEL 1 CHANNEL 2CHANNEL 2
CHANNEL 3/4CHANNEL 3/4 CHANNEL 5/6CHANNEL 5/6 LL RRMIXMIX
MIC/LINE 1 MIC/LINE 2 MIC/LINE 3/4 MIC/LINE 5/6
PHONES
MASTER SECTION
MODE
REC REC
RECREC
MASTER SECTION
PEAK
+6
0
-6
-20
POWER48V