


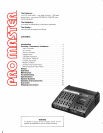
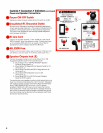


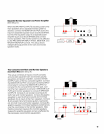

Operotion
1.
Position the microphones and connect them to the
PRO MASTER'" Use both inputs on each channel
~f
more than
SIX
microphones are to be connected.
Use low-impedance microphones and cables to
minimize loss and interference if long microphone
cable lengths are needed.
2.
Position the speakers and connect them to the PRO
MASTER. Make sure the combined speaker load is
not less than 4 ohms. Use minimum cable lengths to
maximize output power. Use the proper cable size
for the required length.
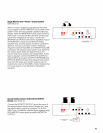
3.
Make any rear-panel patching connections
required (refer to
SETUPS
section). All patching
connections except the MIC
OUTPUTare standard
two-conductor,
%-inch phone jacks.
4. Connect any external effects device to the PRO
MASTER EFFECTS OUTPUT and AUX INPUT
jacks. Power for the external effects device can be
obtained from the PRO MASTER rear-panel
UNSWITCHED AC receptacle
(1 00 watts
maximum).
5. Connect the PRO MASTER line cord to an ac source
capable of supplying 500 watts. If extension cords
are required, make sure they are 18 AWG or larger.
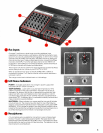
6. Make sure the PRO MASTER air louvers are not
blocked. Check to make sure the air filter is clean
7.
In low ambient light conditions, a high-intensity,
low-wattage lamp (not supplied) can be plugged
into the rear-panel UNSWITCHED AC receptacle
(1
00 watts maximum).
8.
If
des~red, the supplied Instruction Plate can be
mounted on the PRO MASTER front panel above
the DB PEAK indicators.
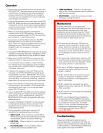
IMPORTANT
The Instruc-
tion Plate
adhes~ve backing is designed for perma-
nent mounting; for temporary mounting, leave the
paper backing in place and use double-sided tape.
9.
Set the front-panel controls to their initial settings
(orange marks). Set the INPUT
ATTEN controls for
the usage on each input. Turn on the rear-panel
power ON-OFF switch.
10. Adjust the MASTER VOLUME control to the desired
level. Using program material similar to the actual
performance, adjust the MONITOR, EFFECTS1
REVERB and EQ controls as desired for the most
pleasing sound.
11. Using the FEEDBACK
FINDER" set the equalizer
for the highest feedback-free sound level. The
equalizer controls can then be "touched up" for
most pleasing sound.
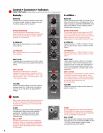
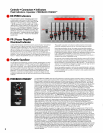
12. During operation, observe the various LED
indicators for possible setting corrections:
A. INPUT CLIP-If on constantly, use the INPUT
ATTEN to reduce the input signal and eliminate
the distortion. (Set for occasional flashing.)
B. DB PEAK-Observe action to monitor output
power level.
C. PA OVERLOAD-If on constantly, reduce
14
volume andlor check speaker load.
D. TEMP WARNING-Check for air blockage,
dirty air filter, shorted speaker cable or excessive
heat near the console.
E. SHUTDOWN-Check for excessive console
heating or cooling fan failure.
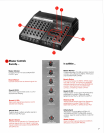
Mointenonce
The PRO MASTER is an exceptionally
well-designed unit. All components are of the
highest quality, operating well within their
respective ratings to assure long life. The fol-
lowing list of Do's and Don'ts describes mini-
mal operating precautions and maintenance to
provide years of dependable service.
DO clean the air filter every 100 hours of
operation (more frequently in dusty or dirty
areas). Stand the console on its rear bump-
ers, remove the screw securing the filter, and
slide it out of its slot. Rinse the filter in water or
a mild detergent solution, allow to dry, and
replace.
DO unplug the console before cleaning. DO
clean the outer surfaces of the console with a
clean, damp cloth and mild detergent. DON'T
use strong solvents or cleaning fluids.
DO use an
18
AWG or larger heavy-duty
extension cord when additional line cord
length is needed.
DON'T operate the console with air louvers
blocked, or placed on a radiator or
heat-
producing equipment. Avoid operation in
direct, hot sunlight.
DON'T replace the rear-panel fuse with a
different size or type. Use only
4A, SLO-BLO,
250V, type 3AG.
DON'T risk fire or shock hazard by operating
the console in rain.
DON'T use unbalanced low-impedance
microphones with the SIMPLEX 24V switch
on; turn off the switch
if
not required for power-
ing condenser microphones.
If
simplex
power is in use, connect unbalanced
low-
impedance microphones through a line
matching transformer (Shure
A95UF)
to a HI IMP INPUT:
Troubleshooting
Should any difficulty be encountered in
console operation, the problem can often be
traced to some simple source such as an error
in interconnection.
The.following is offered as a
basic guide to this type of problem.