


6
INSTALLATION AND SYSTEM SETUP
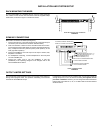
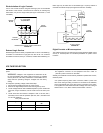
RACK MOUNTING THE MIXER
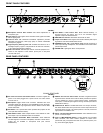
To mount the SCM810 in a standard 483 mm (19-inch) audio equipment
rack, slide the mixer into the rack and secure it with the supplied Phillips
head screws, as shown in Figure 4. Use all four screws.
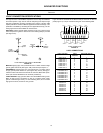
RACK MOUNTING THE SCM810/E
FIGURE 4
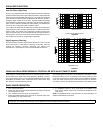
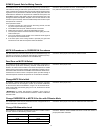
SCM810/E CONNECTIONS
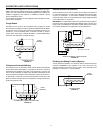
Make audio connections as follows (see Figure 5).
1. Connect microphone- or line-level signal sources to the Channel Input
connectors (use conventional 2-conductor shielded cables).
2. Insert a screwdriver or other tool in the slot above each block connec-
tor and adjust the input slide switch as required: microphone (left posi-
tion), microphone with 48 V phantom power (center position), or line
level (right switch position).
3. Connect the SCM810 Line Level Output to the input of mixers, EQs,
amplifiers or recorders.
4. For headphones monitoring, connect headphones to the front-panel
1/4-inch PHONES jack.
5. Connect the power cord to 120 Vac (SCM810) or 230 Vac
(SCM810E). If the operating voltage is to be changed, refer to the
Internal Modifications section.
AUDIO CONNECTIONS
FIGURE 5
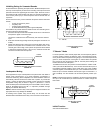
OUTPUT LIMITER SETTINGS
The output limiter prevents distortion during loud program peaks without af-
fecting normal program levels. This prevents overloading of the devices
connected to the SCM810/E output.
Increasing the individual channel or Master Gain controls will increase the
average output and, in turn, the amount of limiting. As supplied, the out-
put limiter is defeated. However, you can change the limiter threshold so
that the peak output level is +4, +8, or +16 dBm. Refer to the Internal Mod-
ifications section.
TO STEREOOR MONOHEADPHONES
FROMAUX– OR LINE–LEVELSOURCE
TOAMP/RECORD/MIXER INPUT
TO LINKED SCM810 MIXERS
TOADVANCED FUNCTION WIRING
TO 120 VAC POWER SOURCE
TOAMP/REC/MIXER INPUT (CH. 1–7)
FROM MIC/LINE SOURCE(CH. 1–8)
OR FROMAUX SOURCE (CH. 8)
MIXER OUTPUT TOAMP/REC/MIXER INPUT