


7
EQUALIZER FUNCTIONS
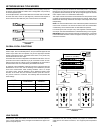
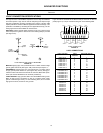
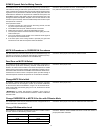
Low Cut Filter (High-Pass)
The low-cut (or high-pass) filter allows all frequencies above its cutoff point
to pass from filter input to filter output without attenuation, while frequencies
below the cutoff are attenuated (see Figure 6). The cutoff point is defined
as the frequency where the signal has dropped 3 dB relative to the flat, or
bandpass, region. Below the cutoff point, the filter exhibits increasingly
more attenuation as the frequency diminishes. The rate at which this atten-
uation occurs is defined in decibels per octave (dB/oct). The SCM810 has
a one-pole, low-cut (high-pass) filter of 6 dB per octave.
Low-cut filters are ideally used for attenuating, or rolling off, the audio signal
where extraneous noise, excessive proximity effect, or other unwanted ma-
terial is present. For example, the low-frequency vibration cause by foot-
steps and vehicle traffic can be transmitted through microphone stands to
the microphone, and then into the sound system. These frequencies, typi-
cally ranging from 5 to 80 Hz, are generally not desirable.
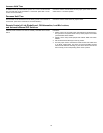
High-Frequency Shelving
The fixed-frequency equalizer produces a 6 dB boost or cut at 5 kHz and
above (see Figure 7). High-frequency shelving is extremely useful for
boosting flat frequency response, tempering very sibilant vocal
microphones, or enhancing the sound of off-axis lavalier microphones.
LOW-CUT FILTER EFFECTS
FIGURE 6
HIGH-FREQUENCY SHELVING EFFECTS
FIGURE 7
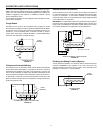
USING AN EQUALIZER/FEEDBACK CONTROLLER WITH AN AUTOMATIC MIXER
When setting up a sound system which has an outboard equalizer or feed-
back controller in the signal chain, set the SCM810 to MANUAL. This acti-
vates all microphone inputs, so every possible feedback path is open. With
the SCM810 in MANUAL mode, equalize the sound system and/or “Ring
Out” the room to set the feedback controller.
After equalizing the sound system, set the SCM810 to AUTOMATIC mode.
Remember that the input of an automatic mixer drops by 3 dB every time
the number activated inputs doubles. When using an SCM810 in MANUAL
mode, the master output drops by 9 dB when all 8 inputs are activated.
Conversely, it will rise by 9 dB when switched back to AUTOMATIC mode.
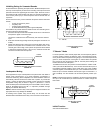
BASIC MIXER OPERATION
1. Turn on the Power switch.
2. Adjust each channel level so that its Overload LED flickers only during
very loud speech or noise.
3. Turn unused channel controls full counterclockwise.
4. Adjust the SCM810 Master level control for the required output level,
as indicated by the output peak meter.
5. If a headphone monitor is to be used, adjust the PHONES control
knob until the desired volume level is reached.The SCM810/E is now
ready to use.
NOTE: The SCM810/E mixer is fully automatic. For most applications, no
additional adjustments are required.
-10
-8
-6
-4
-2
0
+2
20 100 1,000 5,000
FREQUENCY (Hz)
FULL CW
FULL CCW
50%
ROTATION
200
-10
-8
-6
-4
-2
0
+2
+4
+6
+8
+10
1,000 10,000
20,000
FREQUENCY (Hz)
FULL
CW
FULL
CCW
50%
ROTATE
NOTE: The extreme sensitivity of the IntelliMix circuitry may allow some channel gating due to static discharge or electrical disturbance to the power
or signal lines. The unit will not be damaged: normal operation will resume after the disturbance ceases.