


11
English
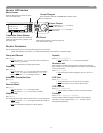
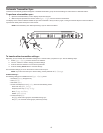
Automatic Frequency Selection
Follow these steps to use the channel scan and group scan features.
Before you begin...
• Install the receivers in the location where they will be used and power them on.
• Mute all inputs on mixing devices connected to receivers.
• Turn off all bodypack or handheld transmitters for the systems you are setting up.
• Turn on potential sources of interference such as other wireless systems or devices, computers, CD players, effects processors, and digital
rack equipment so they are operating as they would be during the presentation or performance.
Single Receiver
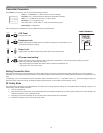
1. Select Radio > Scan > Chan Scan using the Navigate keys on the receiver LCD interface.
2. Turn the Control wheel to select a group.
3. Press Chan Scan. The display indicates that the receiver is searching. Once it has finished, it displays the selected channel.
4. Press the flashing ENTER button to accept the suggested channel.
5. Sync the transmitter (see page 15).
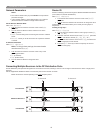
Networked or Dual Receivers
With networked or dual receivers, you can take advantage of the group scan feature to set group and channel settings for all the receivers at the same
time. (See page 12 for instructions on networking.)
Perform a group scan from any receiver...
1. Select Radio > Scan> Group Scan using the Navigate keys on the receiver LCD interface. The display indicates that the receiver is
searching (Scan In Progress). Once it has finished, it displays the group with the most open channels.
2. If you wish, turn the Control wheel to change groups. The number of open channels for each group is displayed.
3. Press the flashing ENTER button to set all receivers to open channels in that group.
NOTE: The group scan feature only works for receivers in the same frequency band. For example, if you did a group scan on a “H4” band
receiver, all “H4” band receivers would be set up, but not “J5” band receivers.
Multiple Receivers—Not Networked
If your receivers are not networked (or in different bands), the group scan cannot automatically set their group and channel settings. However, you can
still take advantage of the group scan feature to find the group with the most open channels and the channel scan feature to find open channels in that
group.
Find the group with the most open channels...
Perform a group scan using the steps for a networked receiver (above). However, make a note of the selected group before pressing the flashing ENTER
button to accept it.
Set the receivers to open channels in that group...
Perform a channel scan on the remaining receivers using the steps for a single receiver (above). Make sure to select the same group for each receiver
before performing the channel scan.
IMPORTANT: After setting the channel for the first receiver, immediately sync the transmitter for that receiver and leave it on so that the
next receiver detects that channel during its channel scan. Otherwise, all the receivers will be set to the same open channel.
NOTE: Receivers in different bands (H4, J5, L3, etc.) do not need to be set to the same group.