


– 7 –English English
Changing Receiver Squelch Control Settings
The receiver SQUELCH control is factory–preset for typical environments. If
squelch adjustment is necessary (as indicated by continuous glow of the orange RF
or red PEAK lights when the transmitter off), proceed as follows:
1. Position the system as it will be during use.
2. Using a screwdriver or fingernail, rotate the headphones VOLUME control on the
receiver to the full counterclockwise position.
3. Turn the transmitter POWER switch off.
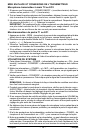
4. If the RF or PEAK lights are on or are flickering, slowly turn the receiver SQUELCH
control clockwise until they turn off. Continue turning the control clockwise slightly
past this point. See Figure 8.
NOTE: Rotating the SQUELCH control toward MIN (counterclockwise) makes the re-
ceiver more sensitive and increases the system’s range. However, it also allows the
signal to become noisier before it is muted. Rotating the SQUELCH control toward
MAX (clockwise) reduces the system’s range, but prevents interfering signals and
noise from overriding the squelch when the transmitter signal is not present.
FEATURES AND CONTROLS
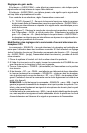
VP3 Receiver (Figure 9)
1. Antenna: Receives RF signals from the transmitter. Pivot the antenna as required
to maintain vertical orientation.
2. Belt Clip: Allows the receiver to be worn on a belt or waistband. The clip can be
removed when the hook–and–loop (VELCRO type) mounting strip or “shoe”
adapter is used.
3. 12 Vdc Power Input Connector: Accepts 12 Vdc power from any well–filtered 12
Vdc (at 100 mA) power supply.
4. Headphones Output Connector: Insert headphones mini–plug (stereo/mono
compatible) into this connector to monitor the audio signal.
5. Headphones VOLUME Control: Rotate this knob to increase or decrease the
headphones output level.
6. Battery Compartment: Hinged cover on provides access to the battery.
7. Audio Output Connector: 3–pin miniature connector provides balanced output
to video camera or audio mixer.
8. AUDIO PEAK Indicator: Red light indicates audio overload. During normal operation,
the light flickers only on loud signals. See Audio Gain Adjustments section.
9. POWER/RF Indicator: Green POWER ON light glows when the receiver is turned
on. An orange light indicates that an RF signal is present.
10. OFF/ON Switch: Turns the VP3 receiver on and off.
11. Squelch Control: Mutes the receiver when no signal is received. Use the supplied
screwdriver to adjust the squelch level. See Changing Receiver Squelch Settings.