


– 8 – EnglishEnglish
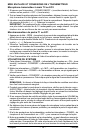
T2 or EC2 Hand–Held Microphone–Transmitter (Figure 10)
1. Grille: Protects the microphone and helps reduce breath sounds and wind noise.
2. Antenna: The EC2 microphone-transmitter includes an external helical antenna with
a miniature female coaxial connector. The T2 includes an internal antenna comprised
of the 9 V battery case and the printed–circuit board ground plane.
3. MICROPHONE ON/OFF Switch: Mutes the microphone without turning the trans-
mitter off, so no “pop” or “thump” sounds occur when the microphone is turned on
and off. Also prevents the receiver from picking up unwanted signals.
4. POWER ON/OFF Switch: Turns transmitter on and off.
5. Battery Test Indicator: Illuminates when the POWER switch is turned on and a
“good” battery is installed.
6. Battery Compartment: Unscrewing the handle and sliding it downward exposes
the battery compartment and audio GAIN Switch (8).
7. Frequency Identification Label: Located inside the battery compartment, this la-
bel lists the transmitter’s operating frequency.
8. Audio HI/LO GAIN Switch or Control: Controls the audio level of the micro-
phone.
9. Low Battery Indicator (T2 Only): Red light glows when one hour or less of useful
operating tie remains; when this light glows, change the battery at the first opportunity.
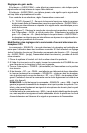
T1 or EC1 Body–Pack Transmitter (Figure 11)
1. Microphone Jack: The microphone cable or the WA310 microphone adapter
cable plugs into this connector.
2. Battery Test Indicator:Glows when the POWER switch is turned on and a “good”
battery is installed.
3. MICROPHONE ON/OFF Switch: Mutes the microphone without turning the trans-
mitter off, so no “pop” or “thump”sounds occur when the microphone is turned on
and off.
4. POWER ON/OFF Switch: Turns transmitter on and off.
5. Antenna: A flexible antenna wire is permanently attached to the bottom of the
body-pack transmitter. For proper operation, the antenna must
be in the vertical
position, not coiled or bundled.
6. Audio Level Control: Allows audio level adjustments for various sound sources.
A small screwdriver is supplied to make adjustments.
7. Belt Clip: Allows the transmitter to be worn on a belt or waistband.
8. Battery Compartment: Hinged cover on bottom surface exposes the battery
compartment.
9. Low Battery Indicator (T1 only): Red light glows when one hour or less of useful
operating time remains. When this light glows, change the battery at the first op-
portunity.
10. Lavalier Microphone:WL93 subminiature omnidirectional microphone shown.
11. Microphone Mounting Clip: Holds the lavalier microphone so it can be attached
to your clothing.