


11
ASSEMBLY
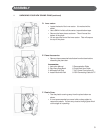
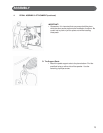
A. Assembly Positions.
You will see the following areas on the bottom of your piano.
1. Right Piano Leg Position
2. Pedal Assembly Position
3. Left Piano Leg Position
4. Back Piano Leg Position
5. Disk Drive
6. Connection Panel
7. Speakers
8. Power Cord Input
9. Serial Number
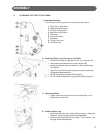
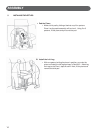
3. ATTACHING THE LEGS TO THE PIANO.
B. Install the Right Leg at the top on the Piano.
• Take one of the piano Legs (A) and line it up to position #1.
• Use the bolts and washers in the piano leg box (G).
• Loosely thread both bolts and washers in the threaded lugs.
Then tighten.
• Again, be careful not to push the piano over when attaching
the legs and pedal assembly.
• Handle the high gloss lacquer finish carefully.
• Do not install the right piano leg at position #3 at this point.
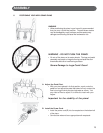
C. Tighten the Bolts.
• Tighten both bolts using the wrench provided (D) or a 3/4”
socket wrench as shown.
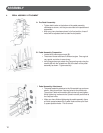
D. Install the Back Leg.
• Install the back piano leg in position #4 as shown in ‘Assembly
Positions’ Use the same procedure as steps B & C.
• So far you have attached 2 of the 3 legs. This is correct. The
third leg will be attached later.
1
5
2
7
3
6
9
8
4