


17
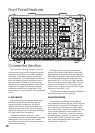
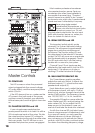
17. AUX SEND MON
This control allows you set up a nice
monitor mix, independent of the main mix.
Adjust these controls on each channel until
your band is happy with the stage monitor
mix. The controls are off when turned fully
down, deliver unity gain at the center
detent, and can provide up to 15 dB of gain
turned fully up. Adjustments to the channel
level (20) or main master level (28) will not
affect the monitor output (9), but channel
EQ (14-16) and gain (21) will.
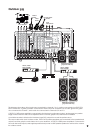
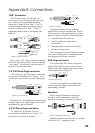
Speaker-level output B (3) can power
passive stage monitors if you set the amp
mode switch (12) down.
Monitor send (9) is a line-level output
that is used to send the monitor signal out
to external stage monitiors. These could be
powered stage monitors, or power amplifi ers
running passive stage monitors.
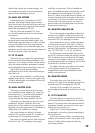
18. AUX SEND FX
These controls allow you to send a sample
of each channel's signal to the internal FX
processor.
Carefully adjust each control to set up the
FX mix as desired. The controls are off when
turned fully down, deliver unity gain at the
center detent, and can provide up to 15 dB
of gain turned fully up.
If you set these controls too high, the
processor’s OL LED (35) may light, showing
that the internal processor is being
overloaded. If this happens, turn down
these controls down.
The processed output from the internal FX
processor can be added to the main mix
with the FX to main control (27), or added
to the monitor mix with the FX to monitor
control (31). Select different presets using
the preset selector (34), experiment and
have fun.
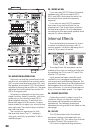
19. OVERLOAD (OL) LED
This LED will come on when the channel’s
input signal is too high. This should be
avoided, as distortion will occur.
If the LED is coming on regularly, check
that the gain switch (21) is set correctly for
your input device: Set it to low if you are
using a line-level input or have a strong
mic signal. Set it to high if you are using a
microphone input.
20. CHANNEL LEVEL
This adjusts the level of each channel sent
to the main mix. The “U” mark indicates unity
gain, meaning no increase or decrease
of signal level. All the way up provides an
additional 15 dB, should you need to boost
a section of the band. If you fi nd that the
overall level is too quiet or too loud with the
level near unity, check that the gain switch
is set correctly.
21. GAIN SWITCH
Press this in (low) if you are connecting a
line-level input source to channels 1 to 6.
Press this out (high) if you are connecting
a microphone-level signal to channels 1
to 6. A strong mic signal, such as from a
kick drum mic, or hot condenser mic, may
require the low setting.
This is the fi rst control that the input signals
meet. It allows you to choose the level
depending on the type of input source you
have connected. If it is set incorrectly, then
the input signals may overload the mixer,
causing distortion, or it may come in too
low, and be lost in noise.
The gain switch allows you to make the
initial level adjustment, appropriate for the
connected device (mic or instrument, for
example). The channel level controls (20)
are more for fi ne-tuning, to balance the
channels appropriately for the song.