


TASCAM RC-F82 7
2 – Names and Functions of Parts
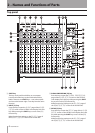
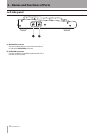
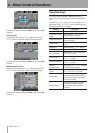
5 REMOTE SETUP [F4] key
Press this key to open the
RC-F82
page of the
REMOTE
SETUP
screen on the HS-P82’s color display.
Press this key while pressing the SHIFT key to use it as
the [F4] function key.
Make function key settings on the
RC-F82
page of
the
REMOTE
SETUP
screen of the HS-P82 unit.
6 Built-in microphone
Use this microphone for talkback. Press and hold the
TALKBACK key to activate it.
The TO LINE OUT 2 switch must be set to ON in
order to output the signal through the LINE OUT 2/
TALKBACK connectors.
7 FADER MODE indicators (TRIM, LEVEL)
These two indicators show the currently enabled fader
function. TRIM indicates control over the microphone
input levels, and LEVEL indicates control over the
levels sent to the stereo bus.
8 VOLUME MODE indicators (TRIM, PAN, LEVEL)
These three indicators show the currently enabled
volume knob function. TRIM indicates control over the
microphone input levels, PAN indicates control over
the stereo positions used in output to the stereo bus,
and LEVEL indicates control over the levels sent to the
stereo bus.
9 SEL [REC] keys (CH1–CH8)
Press one of these keys to open the channel setting
(
CHx
SETUP
) page for the corresponding channel
on the HS-P82’s color display. While pressing and
holding the SHIFT key, press this key to enable/disable
recording for the corresponding channel.
0 SOLO [MUTE] keys (CH1–CH8)
Press one of these keys to enable/disable soloing of
that channel. While pressing and holding the SHIFT
key, press this key to enable/disable record muting of
that channel.
q Rotary encoder knobs (CH1–CH8)
Use one of these knobs to adjust the microphone
input level (TRIM), stereo position sent to the stereo
bus (PAN) or level sent to the stereo bus (LEVEL).
To set the functions of these knobs, select the
Volume Fader Mode
item on the
RC-F82
page
of the
REMOTE
SETUP
screen on the HS-P82 unit.
The current setting can be checked with the VOLUME
MODE indicators.
CAUTION
The same adjustments can be made using both this unit
and the HS-P82. The adjustments made most recently
will be used, regardless of which unit they were made
with. For this reason, if you make an adjustment using
the HS-P82 unit, the setting will differ from that last made
using controls on this unit.
w Channel faders (CH1–CH8)
Use one of these faders to adjust the microphone
input (TRIM) or the level sent to the stereo bus (LEVEL)
for the corresponding channel.
To set the functions of these knobs, select the
Volume
Fader
Mode
item on the
RC-F82
page
of the
REMOTE
SETUP
screen on the HS-P82 unit.
The current setting can be checked with the FADER
MODE indicators.
CAUTION
The same adjustments can be made using both this unit
and the HS-P82. The adjustments made most recently
will be used, regardless of which unit they were made
with. For this reason, if you make an adjustment using
the HS-P82 unit, the setting will differ from that last made
using controls on this unit.
e RETURN IN knob
The left knob (1) adjusts the input level from the
RETURN IN 1 connector, and the right knob (2) adjusts
the input level from the RETURN IN 2 connector.
r RETURN IN SOLO keys/indicators (2)
Press the left key to enable/disable soloing of the
signal input from the RETURN IN 1 connector, and use
the right key to enable/disable soloing of the signal
input from the RETURN IN 2 connector.
When SOLO is on, the indicator above and to the left
of the button lights.
t PHONES knob
Use this knob to adjust the volume output from
the PHONES jack. Both left and right channels are
adjusted simultaneously.
CAUTION
Before connecting headphones, turn the PHONES knob
to the minimum volume. Failure to do so could cause
sudden loud noises to occur, which might damage your
hearing or equipment.
y L/R MONO keys/indicators
Use these keys to turn ON/OFF the mono function for
the left and right channels of the PHONES connector
outputs. The L MONO key turns the mono function
ON/OFF for the left channel, and R MONO key
controls the right channel. When ON for a channel, the
indicator above and to the left of the corresponding
key lights.
u TO LINE OUT 2 switch (TALKBACK)
When this switch is set to ON, the talkback signal is
output from the LINE OUT 2/TALKBACK connectors.
When OFF, the signals from the LINE IN connectors
are output from them.
i TALKBACK key
Press this key to enable talkback using the built-in
microphone. When the TO LINE OUT 2 switch is ON,
the signal input through the built-in mic is output
from the LINE OUT 2/TALKBACK connectors.