


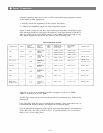

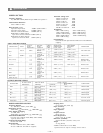


Types of cassette tape
Type
Tape travel hour
Tape thickness
C-30
30
min.
18 micron
C-46
46 min
18 micron
C-60
6O
min.
18 micron
C-90
90
min.
12 micron
C-120
120
min.
9 micron
CAUTION:
A C-120 tape is so thin that it can be easily stretched,
causing tape slack and possible entanglement around
the pinch roller and capstan. We do not recommend the
use of C-120 cassette tapes.
NOTE:
The MCX detects the type of tape (Normal, CrO
2
,
Metal) when the cassette is inserted and the door is
latched, automatically selects the proper EQ and bias
settings, and gives a visual indication on the front
panel.
For highest quality recordings and extended dynamic
range, we recommend the use of metal tape whenever
possible.
SAVING YOUR RECORDINGS
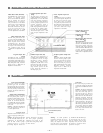
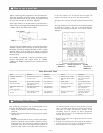
Cassette tapes are provided with two break-out tabs
as shown in figure. To prevent accidental erasure or
overtaping, break the tabs with a screw-driver or
similar tool and remove. You may cover the tab
Cleaning the tape heads
NOTE:
We recommend removal of the cassette receptacle door
prior to the cleaning operation; this will facilitate easy
access to all the inner workings of the tape transport
assembly.
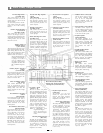
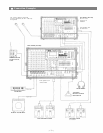
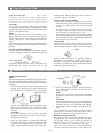
1. The cassette door opens when the EJECT button is
pushed. After opening, press the door downward
(see illustration) to disconnect the "top mounted
detents" which hold the door to the chassis. Now
pull outward and away from the main assembly.
Place the door aside in a safe location for later
cleaning.
CAUTION:
To prevent damage to the transport and head
assembly, use only cotton swabs or a soft cloth for
the cleaning procedure.
2. Using any good grade of commercially available
tape cleaning fluid (or an acceptable substitute such
as alcohol), thoroughly clean the tape heads, tape
guides, and all other metal parts in the tape path.
shown in the illustration. To prevent damage or
degradation of recordings, always store tapes in
locations free from direct sunlight, high temperature
or humidity, and magnetic effects from other electrical
equipment, speaker systems, etc.
openings with adhesive tape if you desire to erase or
record the tape at a later date.
Hints on Cassette Tape Handling
1. Tape Slack can cause the tape to twist or break.
When necessary, always take up slack by inserting
a pencil or similar object into the reel hub and
turning.
2. Winding the tape too tightly on the reel may cause
the tape to rotate unevenly; in worst case, the tape
may bind and not wind from reel to reel.
Before using a tape again after continuous playback
or recording, lightly tap the cassette housing or both
sides, and if necessary, rewind the tape in either the
fast-forward or re-wind mode.
Storing Tapes
Always store cassette tapes in their cases with a
protective insert over the exposed portion of the tape;
if not available, attach a "stopper" made from paper as
3. Clean the rubber parts of the transport assembly
with cleaning fluid, or alcohol, and wipe dry with a
clean, soft cloth.
NOTE:
If a transport "Lubricant" of any kind is used on the
metal parts, take care to avoid contact with rubber
parts.
CAUTION:
The tape heads and guides are carefully adjusted to
ensure smooth and accurate tape travel during both
recording and play back; DO NOT USE EXCES-
SIVE FORCE when cleaning: misalignment may
result.
We recommend through cleaning of the tape transport
assembly after every four to six hours of use to ensure
optimum recording and play back performance.
Demagnetizing the tape heads
The recording head will become "magnetized" after
prolonged use. This residual magnetism will degrade
and possibly destroy your valuable recordings by
adding unwanted noise and distortion, so it is
necessary to frequently "demagnetize" the heads.
There are many inexpensive head demagnetizers
available; follow the manufacturer's directions for use.
micron: 1/1000mm
— 10 —
Types of Cassette Tape
Maintenance of Stereo Cassette Mechanism