


tunes such as 443. Music transferred from analogue tape can exhibit pitch variances
due to playback speed inconsistencies. However you determine the reference pitch,
it is very important to get this right for correct targeting of the pitch correction
operation.
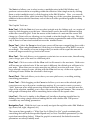
3) Global Pitch Shift- Here you define any global pitch shift you want to perform on
all scanned signal. You would use this, for example, if you have an existing vocal
take that was recorded before the song was transposed.
4) Formant Correction- Choose whether or not you want formant correction.
Normally you will choose formant correction for human vocals, as well as
instruments with a similar resonance (woodwinds, some brass, etc.,) as this will
give you much more natural pitch shift results than without formant correction.
There may be times you will want to work without formant correction, but you
run the risk of the familiar “Chipmunk” sound often associated with pitch shifters.
5) Range- Setting Tune’s detection range according to the singer’s range will help
detection process by narrowing frequency range scanned. While Tune’s pitch
detector is designed to detect the exact pitch of the fundamental frequency of the
input, some cases are challenging. Since we can’t foresee the range in which your
talent sings, we assign a wide, inhuman range as default. However, narrowing the
Range to the singer’s expected vocal range can reduce the risk of false detection.
6) Scale and Root - While these can be changed at a later point, setting them before
the initial scan will provide results that are more immediately usable.
Part 2: Scanning – pitch detecting and initial correction curve creation.
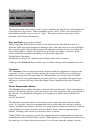
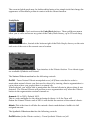
Press Play to scan the audio from the track where Tune plug-in is inserted. Tune will
automatically scan previously un-scanned segments within the ten minute limit. During
the scan, the waveform display area will highlight in orange and display a “Scanning…”
message. Tune is scanning the audio and preparing the initial correction curve, however
the sound output is not yet corrected, so you will hear the track in its original form.
We strongly suggest that you scan an entire song or logical segment of music before you
begin correcting the track. Whereas it’s possible to scan a section of a song, work on that
section’s corrections, and then scan new sections, the fact that Tune will automatically
switch into Scan mode when playing un-scanned regions may prove confusing. With
study and experience you will develop your own way of working with Tune, but for
starters we suggest you work in a methodical manner, beginning with a complete scan of
the song, followed by corrections and fine-tuning.
While scanning, Tune creates the initial suggested correction curve using a set of default
correction values. Speed-15ms, Note Transition-120ms and Ratio-100% are hard coded
into the initial correction graph creation but can be easily edited after the scan, even
before auditioning the initial correction curve.
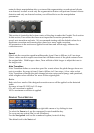
Once you have scanned a segment of music and made your corrections, changing the
underlying audio will not automatically update the graph. If you make editorial changes
to a piece or re-record a segment and drop it into your audio, you will likely need to re-
scan and re-adjust the graph for that section. Select and clear graph segments to refresh
them. After clearing segments, Tune will relate to them as un-scanned and will scan them
on the next pass.