


CLP-990 45
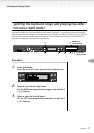
Recording Your Performance
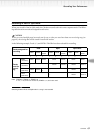
Ending methods:
Replace – The data after the point you stop recording will also be
erased.
Punch Out — The data after the point you stop recording will remain.
If you cancel recording by
pressing the [REC] button,
recording stops when you
press the button. If you can-
cel recording by pressing
the [STOP] button, the Clavi-
nova locates the top of the
song.
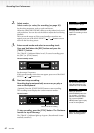
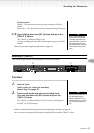
3-2 Keep holding down the [REC] button and press the
[TRACK 1] button.
The [TRACK 1] indicator flashes in red.
(To stop recording, press the [REC] button again or press the [STOP]
button.)
Follow the procedure beginning with Step 4 on page 42.
Recording to [TRACK2]
This section explains how to record another part on the second track.
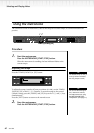
Procedure
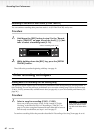
1. Select a voice.
Select a voice (or voices) for recording.
Repeat Step 2 on page 42.
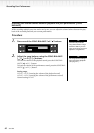
Pressing the [TRACK 1] but-
ton repeatedly toggles
between playback on (the
indicator lights up in green)
and off (the indicator turns
off).
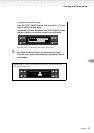
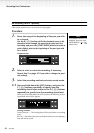
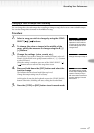
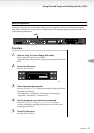
2. Enter record mode and select a recording track.
Press and hold down the [REC] button and press the
[TRACK 2] button.
The [TRACK 2] indicator flashes in red. (To cancel recording, press
the [REC] or [STOP] button.)
Make the recording by following the procedure beginning with Step 4 on page 42.
You can record a new part while listening to playback of the recorded [TRACK 1] data.
TIP
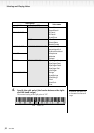
DEMO SONG SELECT
TRANSPOSE
MASTER VOLUME
TEMPO VOICE EFFECT
SONG
CLP-990
MIN MAX
NEW SONG
SONG BALANCE
UPDOWN
BRILLIANCE
TRACK
1
TRACK
2
EXTRA
TRACKS
FILE METRONOME
CONTRAST
SONG
SETTING
START/ STOPSETTING
SPLIT
POINT
VOICE
SETTING
REVERB
CHORUS MIDI
SETTING
OTHER
SETTING
REC
PIANO
MAIN
LEFT
E. PIANO/
BASS
HARPSI-
CHORD
MALLET ORGAN STRINGS/
CHOIR
STOP
START/
PAUSE
SYNCHRO START
EXIT
PIANO/
E. PIANO
HARPSI/
MALLET
ORGAN/
STRINGS
BASS
A B
C D
NO YES
2
2
1
TIP