


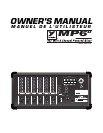


MICROMIX
MICROMIX
7
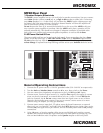
6a. If you are employing a separate power amplifier for the monitor speakers, connect the
main speakers as in (6) then run a shielded patch cord from the Monitor Line Out jack to
the input of the monitor power amp. If you are employing a separate graphic equalizer
for the monitors, run a shielded patch cord from the Monitor Out jack to the input of the
Equalizer. (A good idea: remember there is no channel EQ on the monitor signals and the
built-in graphic EQ is only for the main PA sound). Then, another patch cable from the
EQ's output to the input of the monitor power amp (the Yorkville Beta-150EQ power amp
has a graphic equalizer built in).
7. Position your main PA speakers at the front of the stage, pointing directly out at the audi-
ence. Position your monitor speakers on the stage floor, in front of the mic stands, pointing
up at the backs of the mics. (Remember to use cardioid or uni-directional mics to reduce
the threat of monitor feedback).
8. During a sound check, with the band playing, or other sources feeding the mixer inputs,
make the following control adjustments:
i. Begin with setting all your controls to their nominal positions. Turn the Main Master,
Monitor Master, the Main EFX and Monitor EFX controls to zero. Position the Graphic
EQ sliders and the channel Low and High EQ controls to center.
ii. Where a channel input is used, turn up the channel's Gain control slowly until the
channel Clip LED begins to illuminate, then back down the control a bit.
iii. Turn up the Main Master control until you get the desired the room level.
iv. Adjust the relative levels of the channel Gain controls so that all instruments and vocals
can be heard. Lower or raise the Main Master if necessary, to maintain the room level.
v. Adjust the each channel's Low and High EQ controls to get the best sound on that channel.
Usually, vocal channels will have the Low EQ set in the -9 to -15 region to cut out ‘popping.’
vi. Set the channel Mon controls to the same setting as the Gain, then turn up the
Monitor Master until the performers can hear themselves at adequate volume lev-
els without feedback.
vii. Adjust the relative levels of the channel Mon controls to each performer's preference.
Lower or raise the monitor master if necessary, to maintain the monitor level.
viii. Turn up the EFX controls on those channels requiring effects. Usually this would be
the lead and harmony vocal channels. Reverb may be used on other channels or on
recorded music, but at low levels.
ix. Turn up the Main EFX control until you have the desired amount of effects in the room mix.
x. Turn up the Monitor EFX control if you want effects in the monitor mix. This tends to
increase the tendency for feedback in the monitors, so use as little as possible.
xi. If there is feedback or ringing (the sound you get just before feedback) in the main
mix, use the Main EQ sliders to reduce the level of the frequency that is causing the
feedback. Low sounds are on the left, higher to the right. Pushing each slider up, then
down will allow you to find problem frequencies that may feedback later.
9. Feedback during a performance is usually caused by one of the monitors. The main PA
is less likely to feed back because the mics are so far away from the main PA speakers.
Therefore, if you are using monitors and feedback occurs, try the following procedures:
i. Turn the Monitor master down until the feedback stops.
ii. If you have a graphic equalizer patched between the Monitor output and your moni-
tor power amp, pull down one or two (but not more) of the EQ sliders in the frequen-
cy range where the sound seems to be occurring.
iii. Now turn the Monitor master back up. If the feedback recurs, push the EQ slider(s)
back up to center position and try pulling down one or two others.
iv. In the case of main system feedback, follow the above type of procedure, but using
the Main master and the built in Graphic EQ.