


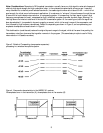

Another technique for minimizing noise under marginal operating conditions is known as squelching. When the level of
the incoming RF signal drops below a certain threshold, the system becomes prone to interference and may even pick up
spurious signals. In older systems, the squelching threshold is a manual adjustment. The WMS 61 and 81 systems use a
pilot tone sent from the from the transmitter, which “instructs” the receiver to adjust its reception level accordingly so
that noises due to improper squelch action are vastly minimized. The receiver goes into muting silently, and only when
the transmitted signal drops below usable level.
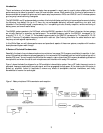
Basic System Description:
Both systems include handheld transmitters with a choice of five head units, a flexible bodypack with both microphone
and line input capability, and a half-rack width, single rack unit receiver. The WMS 81 series also had a unique wireless
receiving unit for use with portable video cameras.
A. Handheld transmitter: The HT61 and HT 81 units are virtually identical. As you hold the unit in your hand, you
will note that there is no antenna pod or dangling wire. In this system a dipole transmitting antenna is contained
completely within the unit. Gently turn the base of the transmitting unit counterclockwise and remove it. Also remove
the black ring that fits just above the base of the unit. When you have done this you will see 4 operating controls, the
battery compartment and a listing of the transmitting frequency bands and a corresponding frequency set number. Let’s
look at these in turn:
1. Channel selector: This is a recessed control that can only be accessed by a small flat-blade screwdriver (contained in
the shipping package), and these channels are indicated 1 through 9 and A through F for a total of 15 channels. The
channel number or letter must agree with the corresponding setting on the receiving unit, and the frequency set number
must agree on both handheld unit and receiving units. (Note: When changing frequency on the transmitter, turn the unit
OFF, set the new frequency, and then turn the unit back ON. The power must be off for the circuit to accomplish the
frequency change.)
2. Gain setting: This control is just below the channel selector and is adjusted by a small screwdriver so that the optimum
signal-to-noise ratio of the transmitted audio signal is achieved.
3. Power On-off: This switch is located just to the left of the gain control. When it is switched on an external red LED
indicates to the microphone’s user that the transmitter is operating. The red LED also serves as a modulation indicator;
normal maximum peaks in the spoken signal will result in a slight increase in the brightness of the LED and thus is an
indication of good transmitting level.
4. Microphone On-off: This switch is located to the right of the gain control. For normal operation this switch must be in
the ON position.
5. Battery compartment: Just below all of the controls is the battery compartment. Two AA batteries will provide up to 12
hours operation; thus, it is not necessary to turn the system power on and off at any time during a normal program or
performance. When the batteries need to be replaced, simply pull on the two cloth ribbons to remove them. It is
important to use high quality alkaline batteries. Generic batteries of lesser quality can drop in voltage, prematurely
causing the transmitter to cease operating in as little as 15 minutes.
When the batteries are in fresh condition, the red LED/status light on the microphone case will glow dimly; when the
status light is illuminated brightly, there are approximately 90 minutes of battery performance left, and the batteries
should be replaced as soon as possible. In the event that the status light does not light up at all, the batteries are dead and
must be discarded. When installing new batteries, use extra caution to ensure that they are oriented correctly.
6. Channel listing: For convenience, the 15 individual frequency bands are listed for each set, and the master set number
is located at the top of the listing.
6