


7. Color coded rings (part number CCS-1): Included in the package is a set of color coded rings and matching rectangular
snap-on color chips. These accessories help you keep track of which microphone corresponds to which receiver. For
example, you can replace the black ring (the one you removed earlier) with the yellow ring, and snap its corresponding
yellow rectangular chip on the lower front center of the receiving unit which is tuned to the same frequency. The color
coded ring on the handheld transmitter can be rotated to expose one or more of the controls so that the user will have
the flexibility of muting the microphone.
B. Bodypack transmitter: The PT 61 and 81 transmitters have exactly the same set of controls that are on the
handheld transmitter. Here are descriptions of front panel controls:
1. Channel selector and gain setting: These controls are located behind the slip-off battery cover. They are to be accessed
by a small screwdriver blade. When the battery cover has been replaced, the gain control is accessible through a small
hole in the cover. Note that just inside the battery cover is a small screwdriver for making all adjustments on the system.
Always replace this handy tool where you found it!
2. Power on-off and signal on-off controls: Looking at the body pack from the top you will see a small security cover that
can be easily rotated, exposing the two switches. The gray one to the left is the signal on-off switch, and the black one to
the right is the power on-off switch. When the power is engaged the LED status light will glow dimly. When the switch
cover is closed, the status LED can be seen just above it, indicating to the user that the unit is functioning.
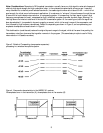
3. Color coded chip: Just below the cover on the top of the unit is a position for a color coded chip to be positioned so
that matched transmit-receive sets can be easily identified.
4. Receptacle for signal input: At the top of the unit you will see to the right a jack for accepting an external microphone
or instrument pickup. This 3-pin receptacle will provide 6-volt powering (on pin 3) for pre-polarized condenser
microphones you may wish to use with the bodypack. There is also the accessory cable (MK/GL) for connecting electric
guitars or keyboards.
When plugging a microphone into the input receptacle, line up the key on the plug to match the corresponding notch in
the receptacle. The plug will then snap into place, and can be removed only by pressing the release button on the plug.
C. Receiving Unit: The SR 61 and SR 81 units have the following front panel controls and indicators, reading from left
to right:
1. On-off switch. This switch applies power from a wall ac unit plugged into the power receptacle on the back of receiver.
2. Remote battery indicator: The low, mid or high status of the battery set in the transmitter is monitored remotely at the
receiving unit. This enables the engineer who has been assigned the task of overseeing the wireless microphone operation
to keep tabs on the status of all transmitters. Here is the code indicating battery status:
HI, MID and LO lit continuously: indicates batteries are good for at least 5 additional hours.
MID and LO lit continuously: indicates batteries are good for at least 3 additional hours
LO lit continuously: indicates batteries are good for 1 additional hour.
LO blinking continuously: indicates less than 1 hour remaining.
7