


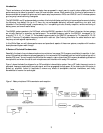

Trying Out the System: A Typical Setup:
Now that you have been introduced to the basic functions of the WMS 61 and 81 units, let’s proceed with a typical
setup. We’ll choose the bodypack and use it with a clip-on lapel microphone such as the AKG Model CK 77 WR-L. (The
L in the model number indicates that this model has the proper locking-type plug-in jack for wireless use.)
Mount the small microphone element onto the lapel clip by gently pushing the wire just below the microphone capsule
into one of the notches on the lapel clip. Make sure that the microphone is oriented so that it points upward toward the
user’s mouth. Plug the other end of the microphone cable into the appropriate jack on the bodypack, making sure that it
is locked in place. Clip the microphone onto your lapel, and select a transmission frequency on the bodypack. (Note that
these numbers/letters are slightly recessed and are best seen in a fairly bright light.) Select a channel. For now, adjust the
gain setting on the bodypack for full-on.
Now, going to the receiving unit, double-check to make sure that the master frequency set on the receiver matches that
of the bodypack. Then, select the same channel number/letter that you set on the bodypack. Power up the bodypack.
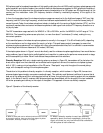
You will now note that the RF LEDs on the receiving unit are all lit, indicating that full strength from the bodypack is
available. If this is not the case, check to make sure that you have actually chosen the correct receiving frequency. Once
you see the green RF LEDs lit, we can move on. If you do not have the correct frequency set on the receiver, you will
notice that the mute light is on and the diversity LEDs are alternating at a rate of about two times per second as the unit
is searching for a non-existent signal.
Next, choose your output option at the back of the receiver. Let’s pick the balanced “mic” option. Set the output switch
to “mic” and plug in an XLR F cable for feeding the down-stream console. Disable phantom powering from the console, if
possible.
Using the screwdriver, advance the front-panel volume control until you have enough signal output from the receiver to
drive the console to the required level. You may want to adjust both the gain setting on the bodypack and volume setting
on the receiver in order to get the best overall level. Make sure that you are not overmodulating the transmitter with
normal speech. To determine this, talk normally and have someone listen carefully to the reproduced sound quality. If
peaks are distorted, reduce the gain setting on the bodypack and make up any gain shortfall with the output volume
control at the receiver.
This is basically all there is to it. As you experiment with other microphones in conjunction with the bodypack you will
find that some will have more output than others, requiring that you reduce the output level of the bodypack. You can
easily tell when you are close to overdriving the bodypack by observing the red LED status light at the top of the
bodypack; the LED will dim slightly on peaks, indicating that you should reduce the gain.
You should also be aware that the AF level indicating LEDs on the receiver are independent of the setting of the output
volume control. The volume control is primarily for adjusting the signal feed level downstream, while the LEDs indicate
the audio level at the output of the demodulator. If it appears excessive, reduce the setting of the gain control on the
bodypack.
9